First time setup for web application
The English user guide is currently in beta preview. Most of the documents have been automatically translated from the Japanese version. Should you find any inaccuracies, please reach out to Flatt Security.
This feature is only available to organizations that have signed up for the Web Application Scanning feature.
This page explains the procedures for creating the target web application for diagnostics and configuring authentication settings for diagnostics and crawling.
Initial Setup Flow
Before diagnosing a web application, you need to perform some initial setup and preparatory work. The overall setup flow is roughly as follows:
- Register the application
- Configure authentication settings
- Configure crawling settings
Register the Application
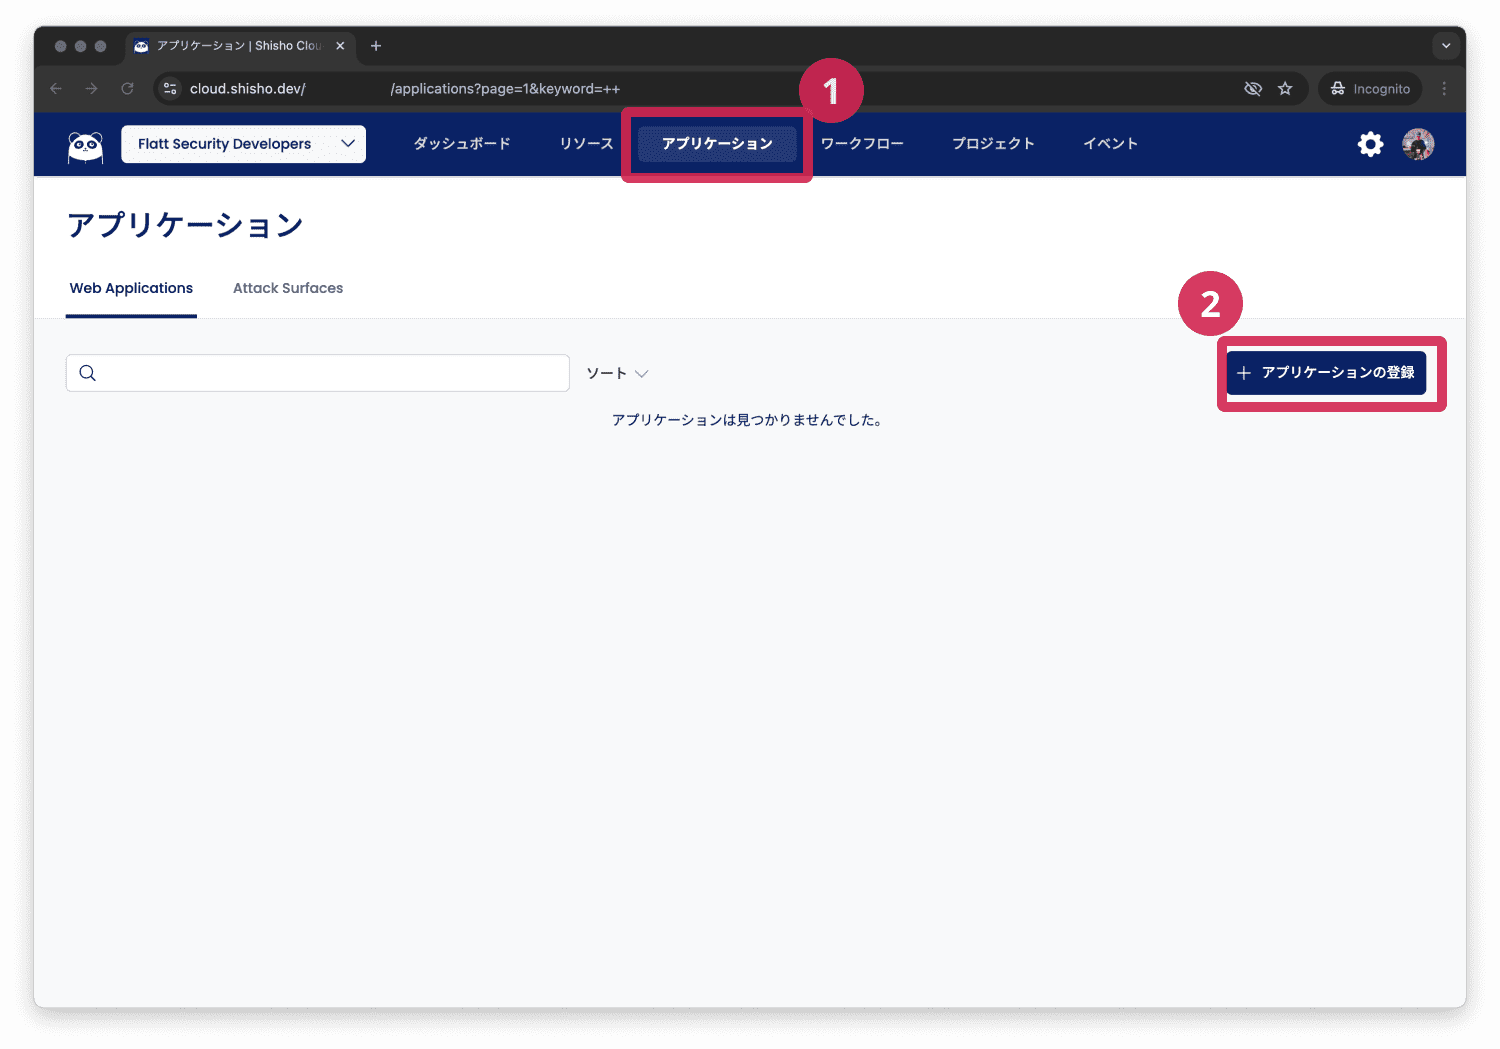
To register or add a new application to be diagnosed, select “(1) Application” from the top menu. Then, click “(2) Register Application” to register the application.
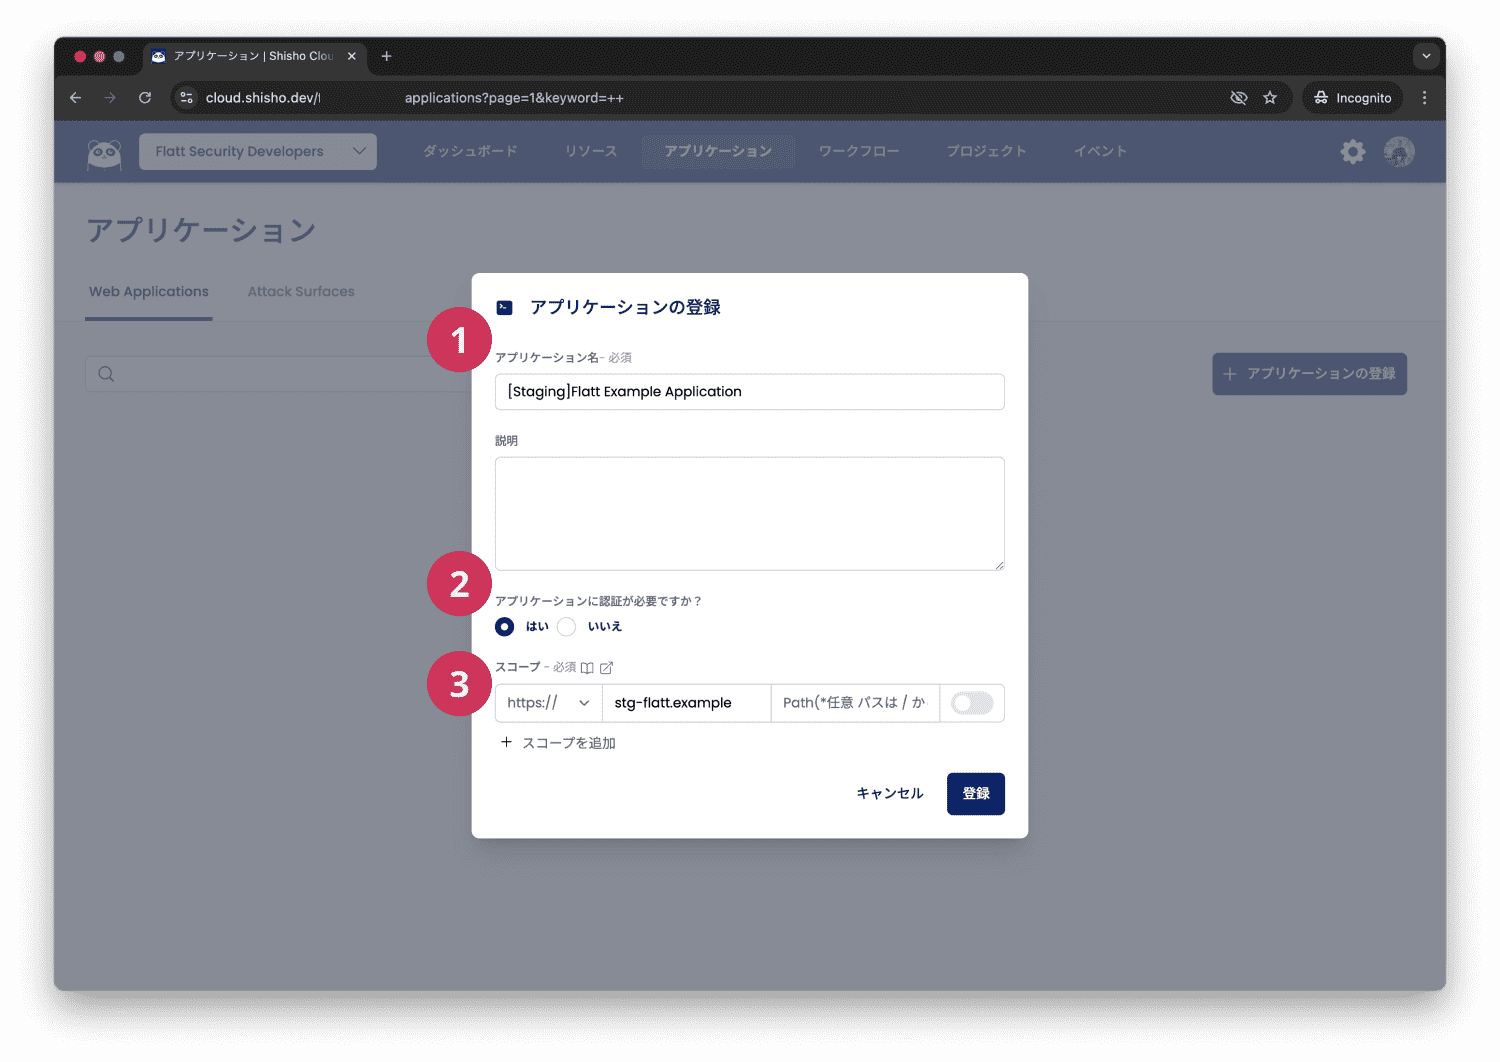
When registering an application, three items are required: the application name, whether authentication is needed, and the scope.
| Setting Item | Details | Example |
|---|---|---|
| 1. Application Name | Set the application name to be displayed in Shisho Cloud. | [Staging]Flatt Example Application |
| 2. Authentication | Select whether the target application requires Basic Authentication or user login-based authentication. | Yes |
| 3. Scope | Define the scope of the application you want to diagnose. Details | https:// |
Configure Authentication Settings (Other Than User Login)
Once you register an application, the initial setup tutorial will begin.
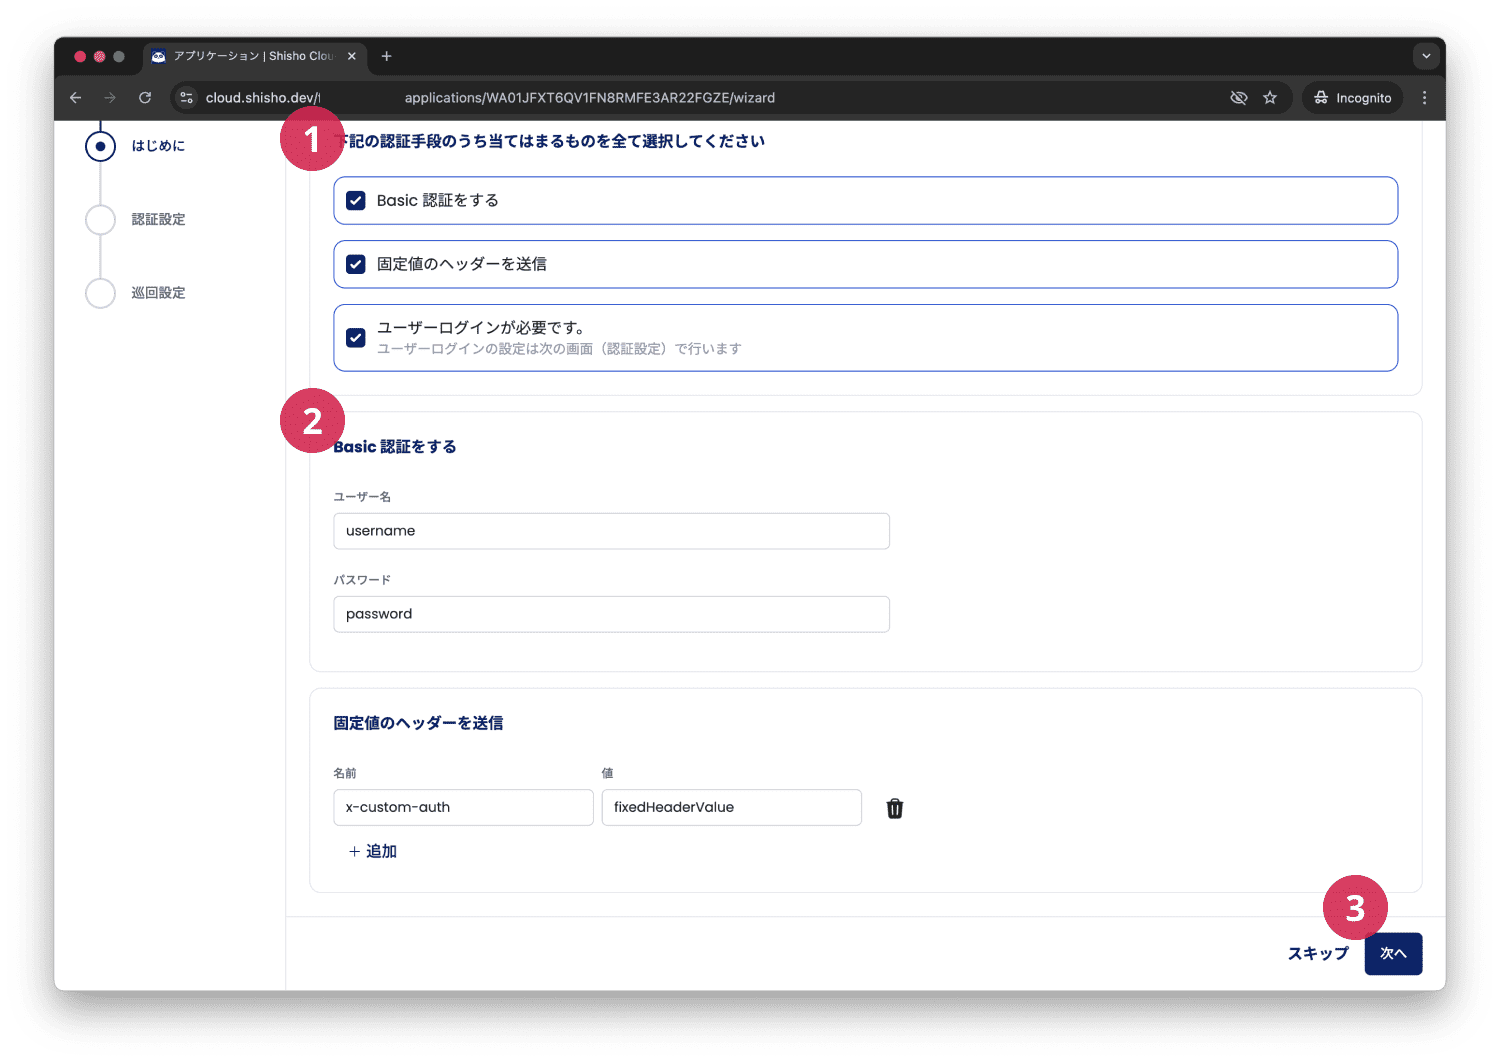
First, (1) select the authentication method for your target application.
Next, if a fixed key is required in the request header (e.g., Basic Authentication or a custom API key authentication), set it here (2). If user login is required, you’ll configure it in subsequent screens.
When you finish setting up Basic Authentication or a fixed header value, click (3) Next.
Configure Authentication Settings (User Login)
Below is an explanation of how to configure authentication if your target application requires a user login with an email address, password, etc.
Overview of User Login Authentication Settings
To allow Shisho Cloud to use authentication information obtained during login when performing crawling and diagnostics, configure settings according to the following flow:
- Choose where to set the authentication information.
- Retrieve the authentication information from the login process.
- Register the authentication information obtained from the login process in Shisho Cloud.
- Test connectivity with a screen that becomes accessible after login.
1. Choose Where to Set the Authentication Information
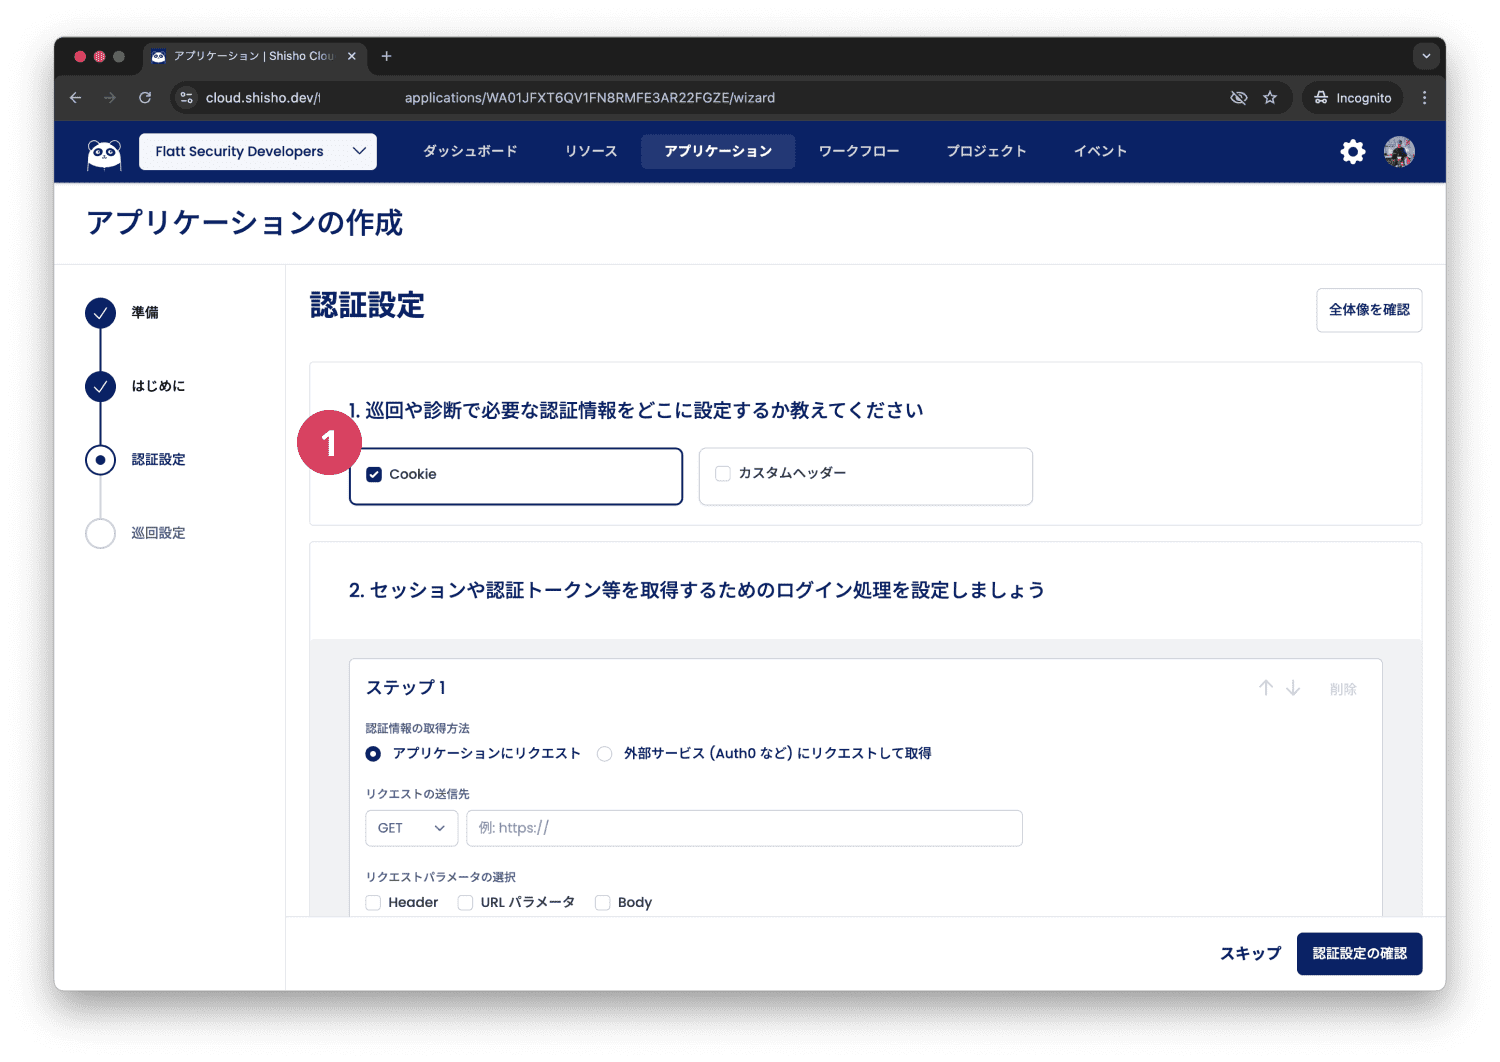
First, choose whether you’re storing the authentication information in a Cookie or setting it in the request header. The procedures to use session tokens or authentication tokens obtained through the login process are explained in the following sections.
2. Retrieve Authentication Information from the Login Process
Set up in Shisho Cloud the request(s) that obtain authentication information generated during user login.
If the target application’s login process is of the type where a user sends their ID and password via a login form—"Sending a Request to the Application"—or if it's a type that sends a request to an external service like Auth0 or Firebase—"Sending a Request to an External Service (Auth0, etc.)"—the required settings differ.
Let’s go through each authentication method.
2-1. Sending a Request to the Application
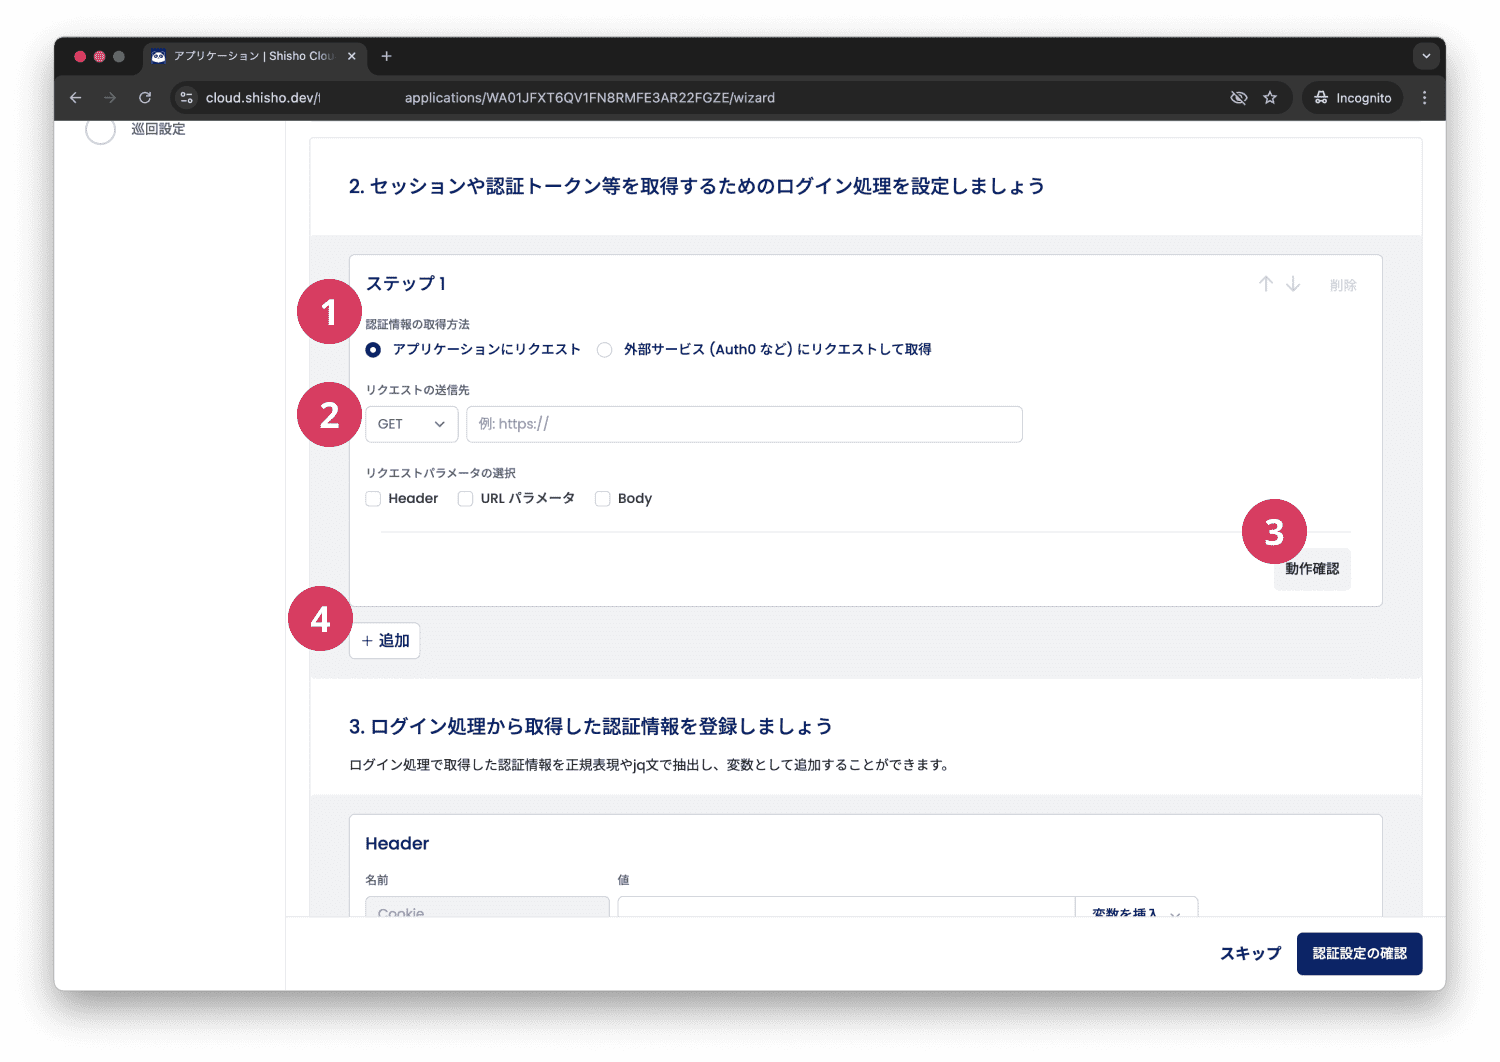
In “(1) Authentication Method,” select “Send Request to the Application.”
Next, in “(2) Request Destination,” enter the URL where the initial login request is sent.
By clicking “(3) Test,” you can check the HTTP request and response to and from the specified endpoint. Use this to verify your input details.
Some login processes may require multiple steps (e.g., when using csrf_token, you might need to GET the login page first, then use part of the response in a POST request). If multiple steps are required, click “(4) Add” to add additional steps.
If you are unsure about the login process flow, we recommend using your browser’s developer tools to check the network activity when logging in.
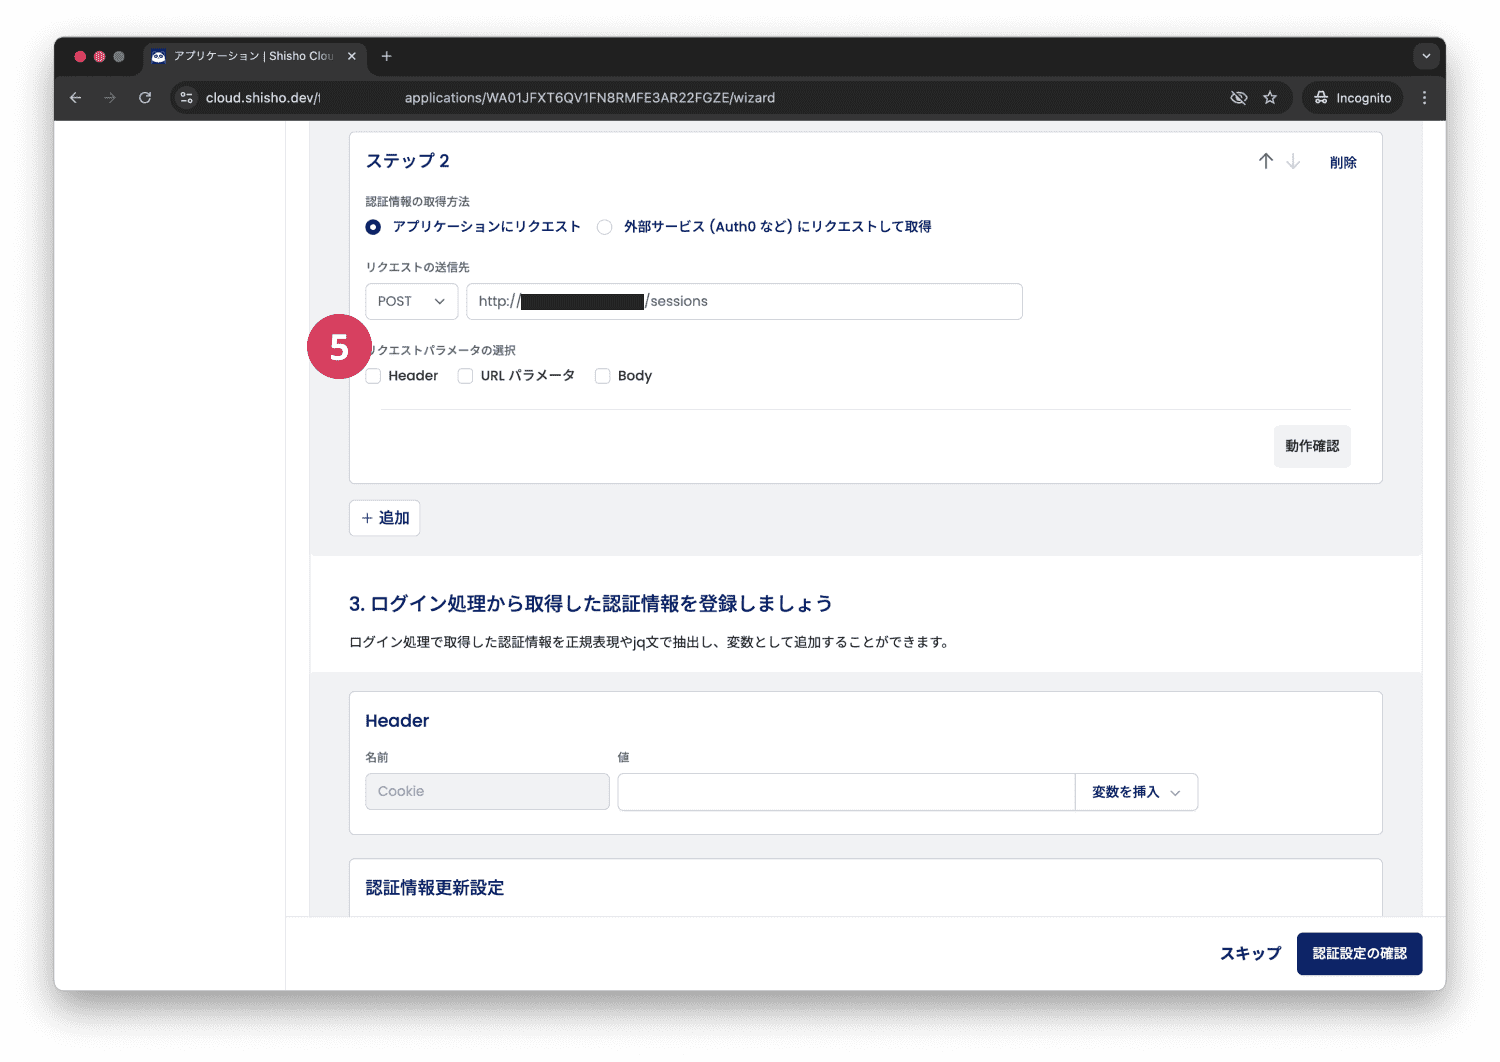
If the login process sets something like csrf_token in the request header, or if user IDs and passwords are set in the request body, you can select “(5) Request Parameters” to display a form for configuring the authentication request details.
About Variables
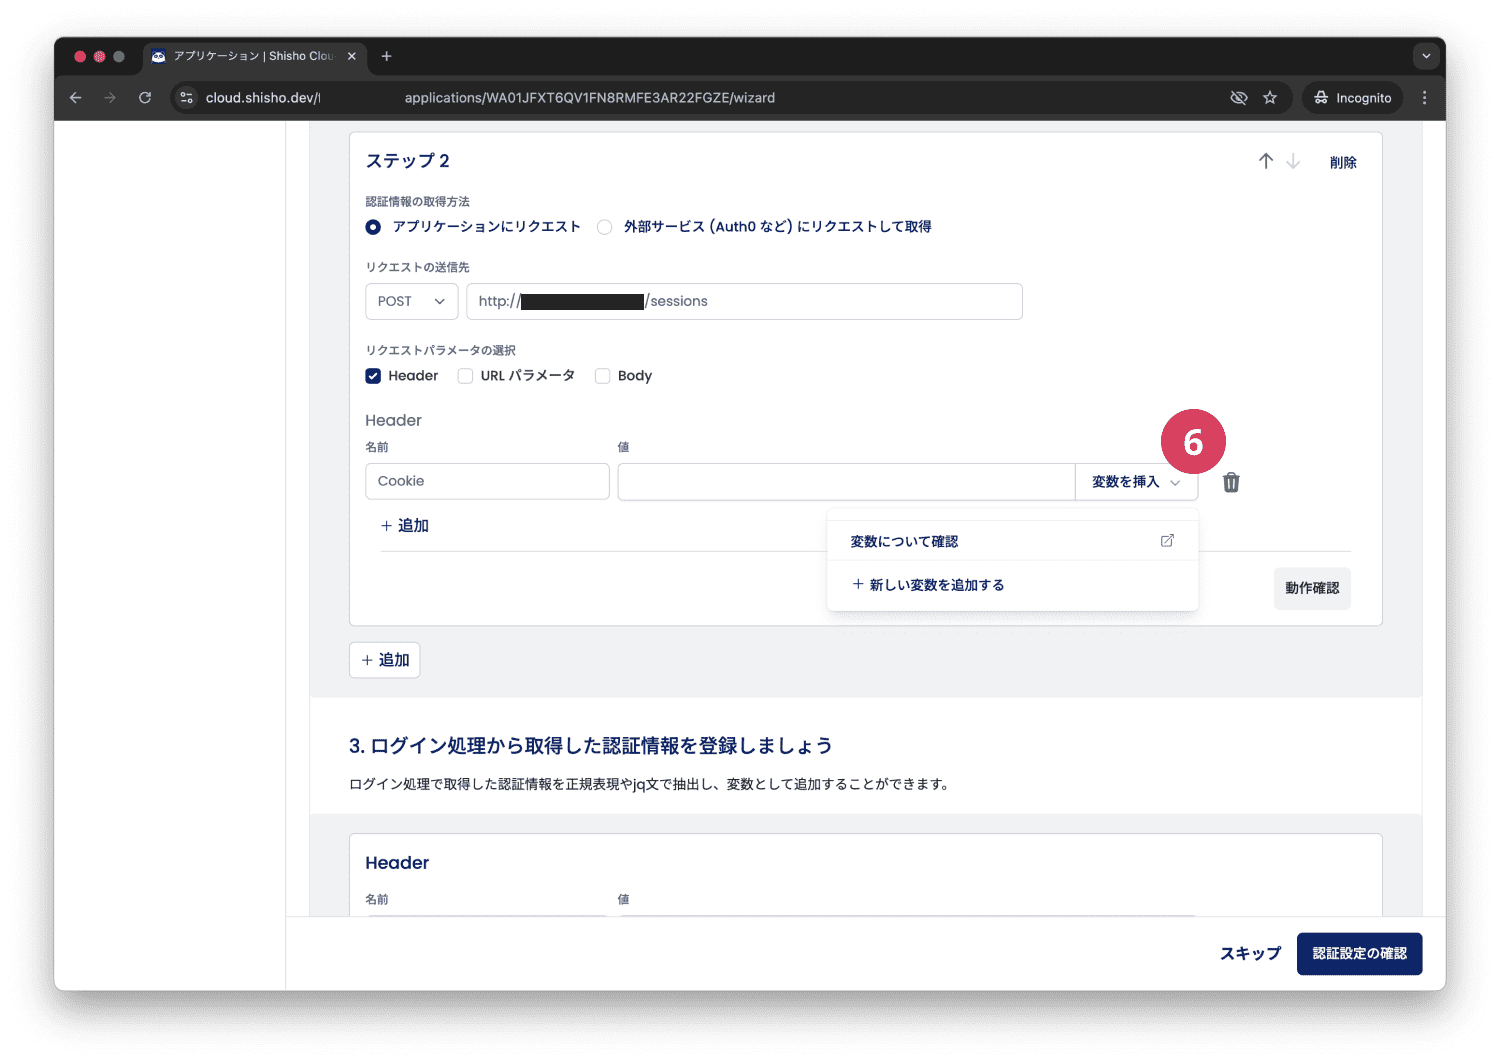
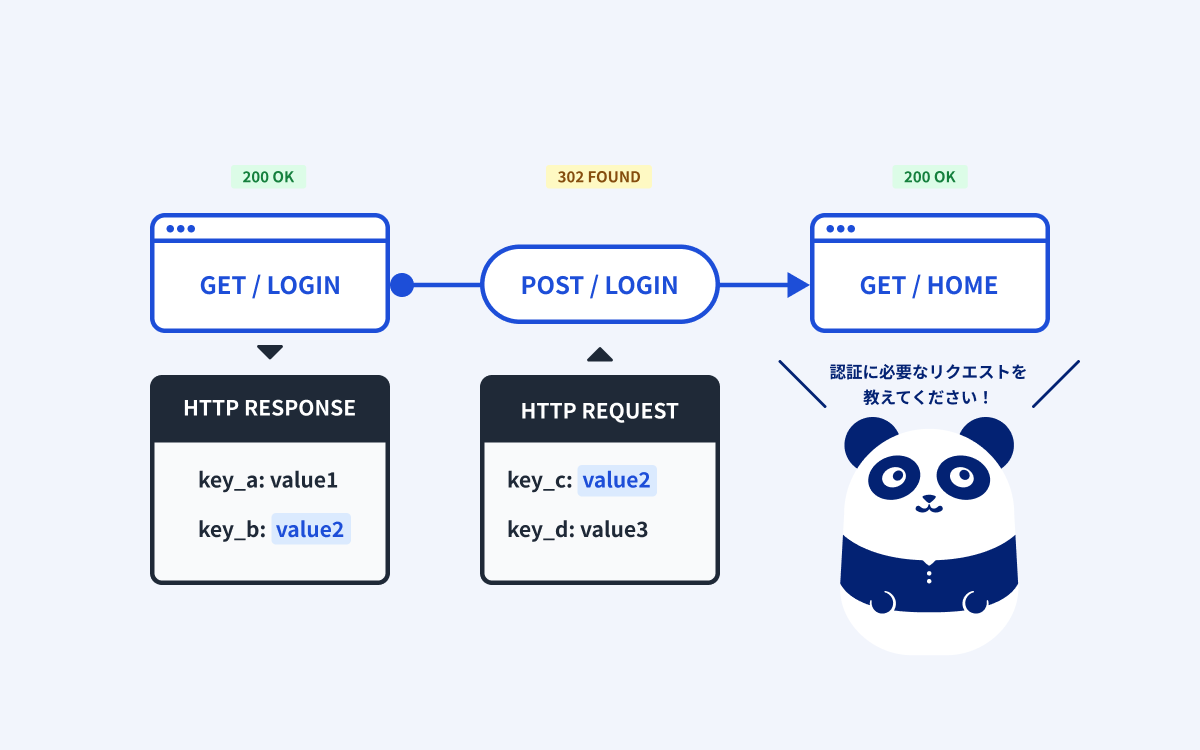
In Shisho Cloud, you can register variables if you want to extract values from the response of the immediately preceding step for use in the next request.
(Example: If you’re using csrf_token, you can extract it from the response of a GET request to the login page.)
If you want to use variables, select “(6) Insert Variable,” and then click “Add a new variable” to create one.
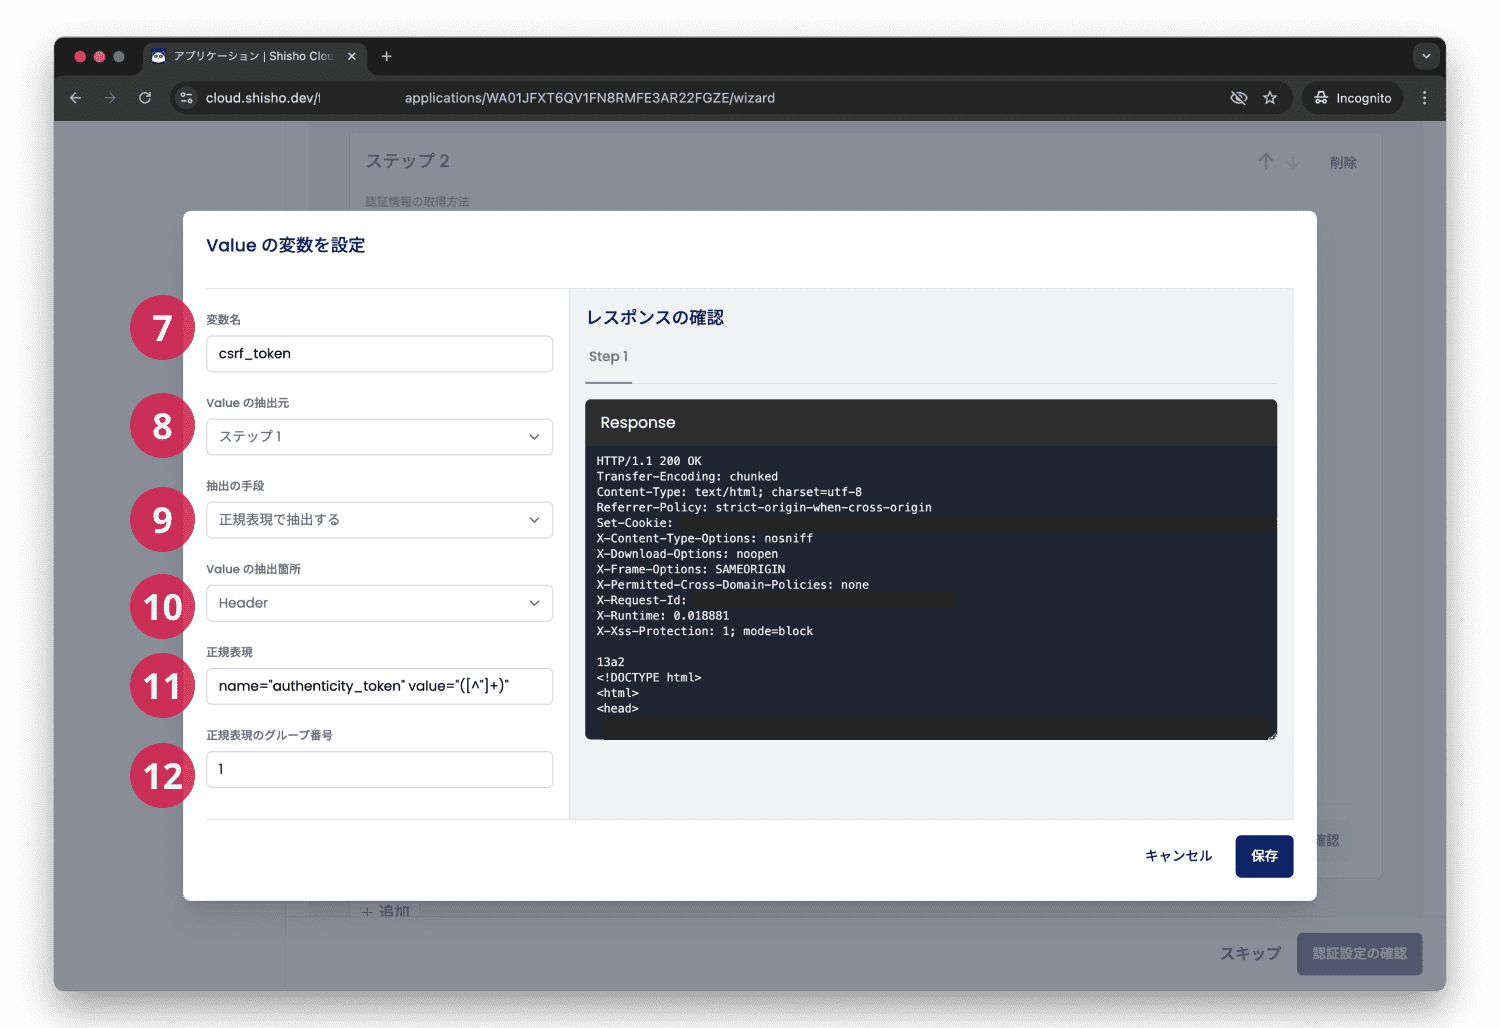
You can configure the following items for a variable:
| Setting Item | Details |
|---|---|
| 7. Variable Name | Specify the variable name used within Shisho Cloud. |
| 8. Value Source | Choose which step’s response to extract the value from. |
| 9. Extraction Method | Choose whether to extract the value via a regular expression or to extract all set cookies. |
| 10. Value Extraction Area | (Regular expression only) Choose whether to extract the value from the Header or Body of the response. |
| 11. Regular Expression | Specify the regular expression. Example: name="authenticity_token" value="([^"]+)" |
| 12. Group Number | In a regular expression (a generic syntax for representing sets of characters), specify which capture group’s string to extract. Example: 1 |
If you want to extract all cookies that are set, you can configure it without writing a regular expression.
(Bear authentication, etc.)
Verifying Configured Values
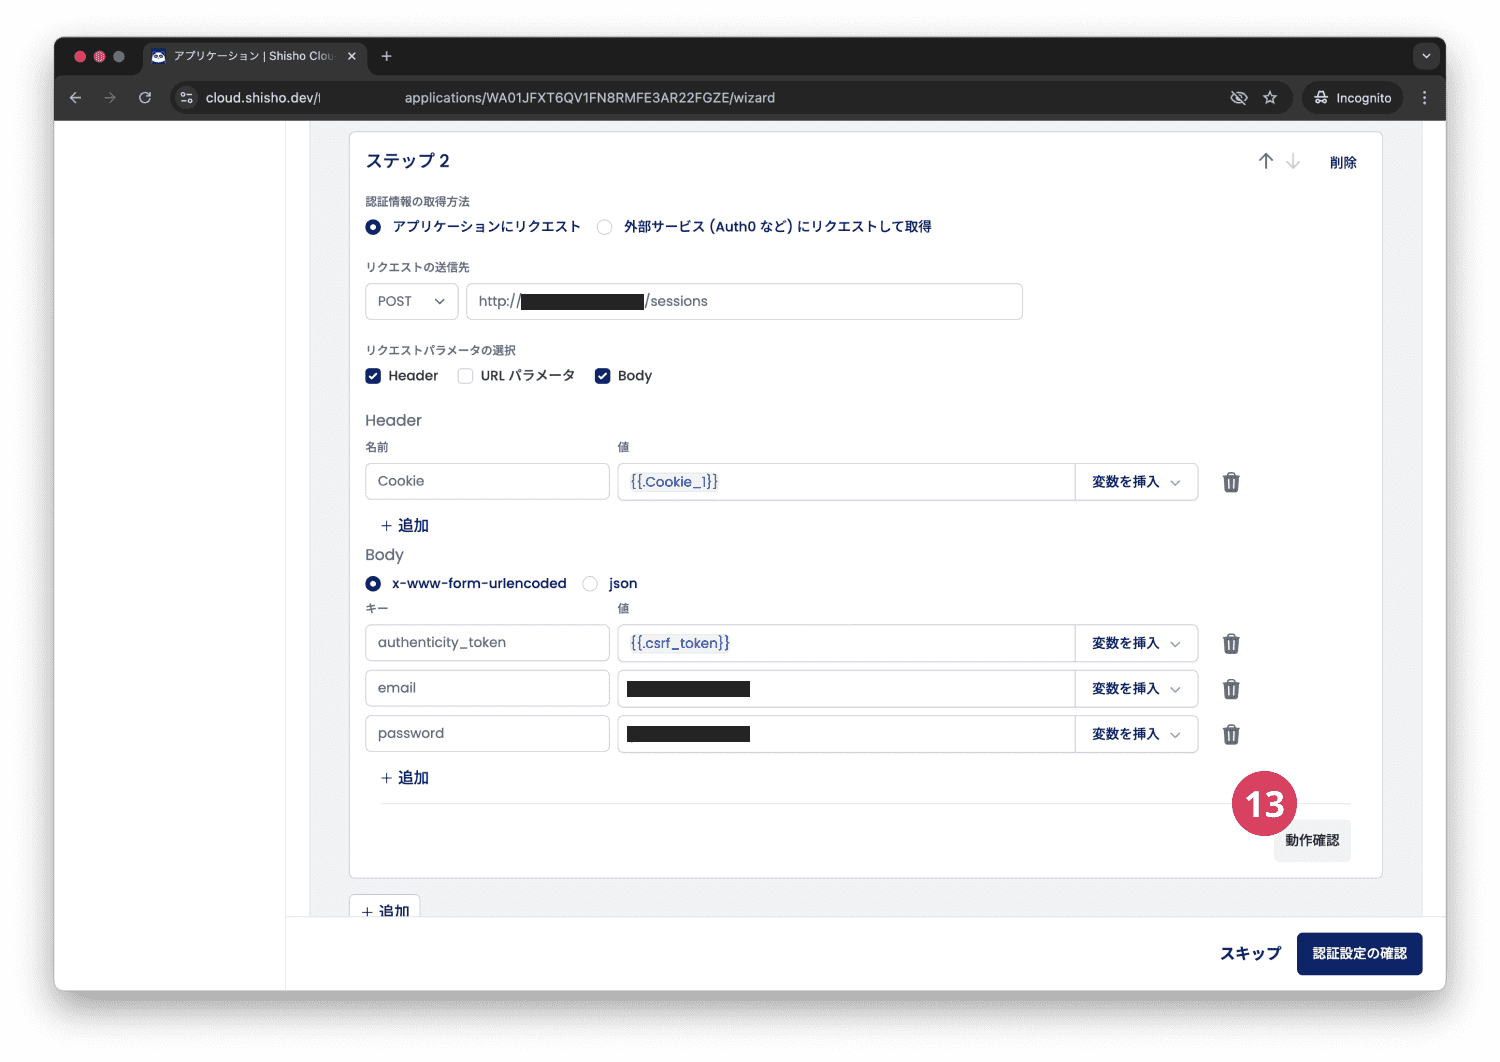
Once you finish configuring the login process, click “(13) Test” to verify whether Shisho Cloud can log in successfully.
2-2. Sending a Request to an External Service (Auth0, etc.)
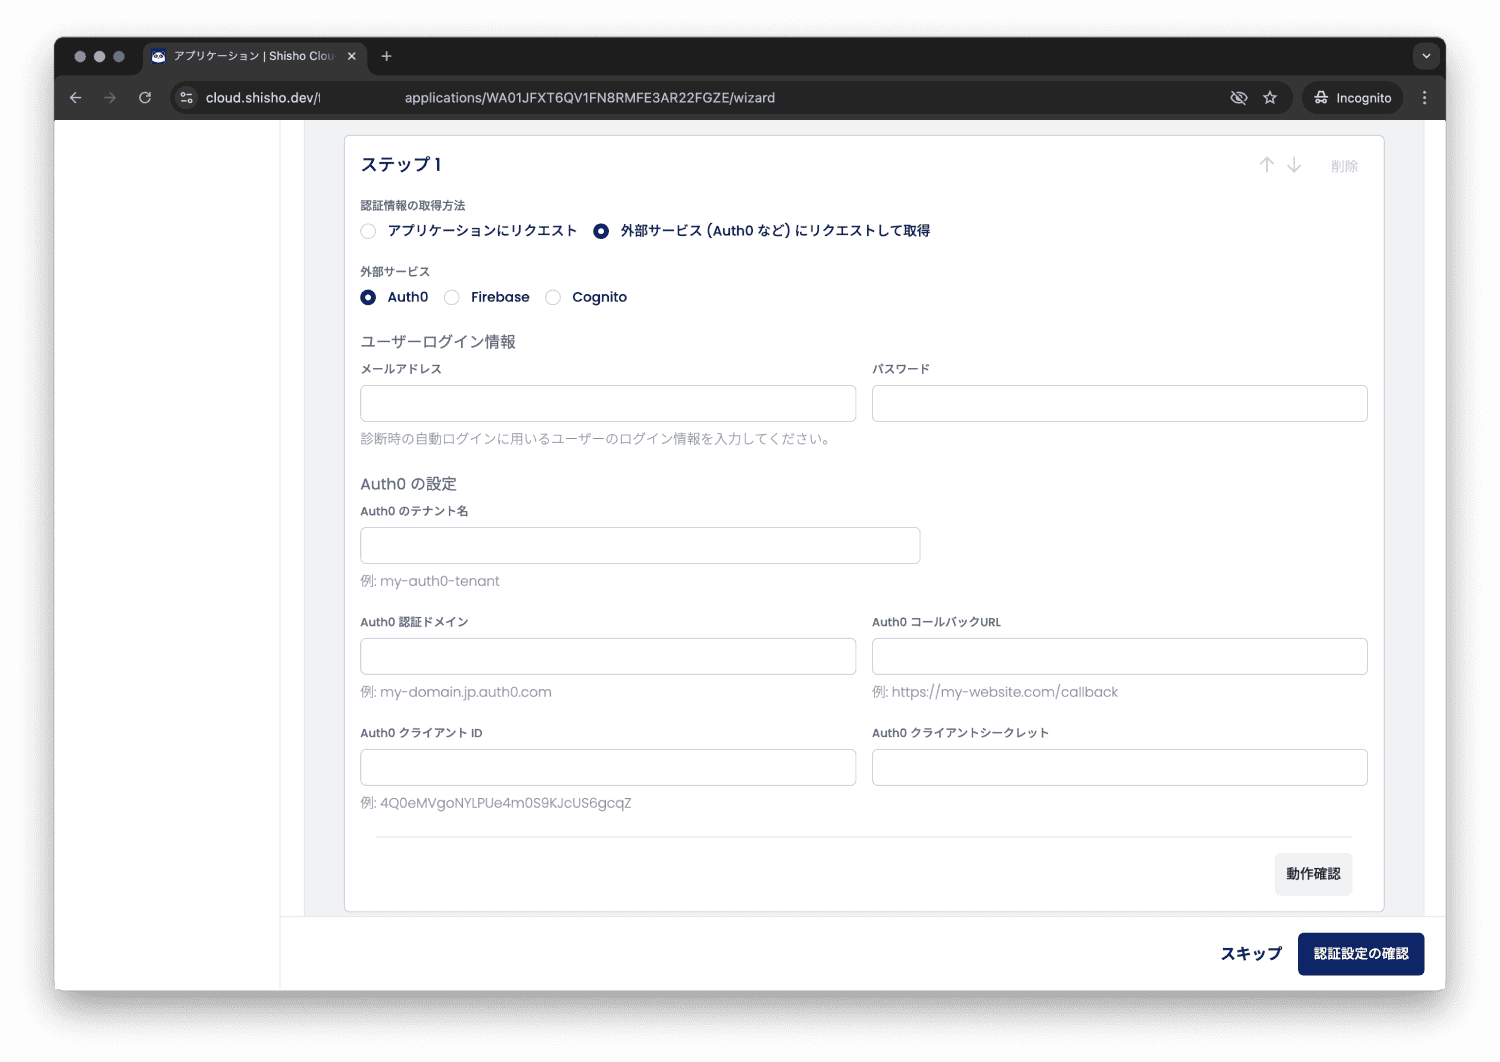
Currently, Shisho Cloud supports authentication with external services such as Auth0, Firebase, and Cognito. Configure the user login credentials for the target application, as well as any related settings for the external service.
3. Registering Authentication Information from the Login Process in Shisho Cloud
In this step, we’ll explain how to set the authentication information obtained from the login process—outlined in "1. Choose Where to Set the Authentication Information"—to either Cookie or a custom header, according to what was selected, and how to use the info obtained in "2. Retrieve Authentication Information from the Login Process."
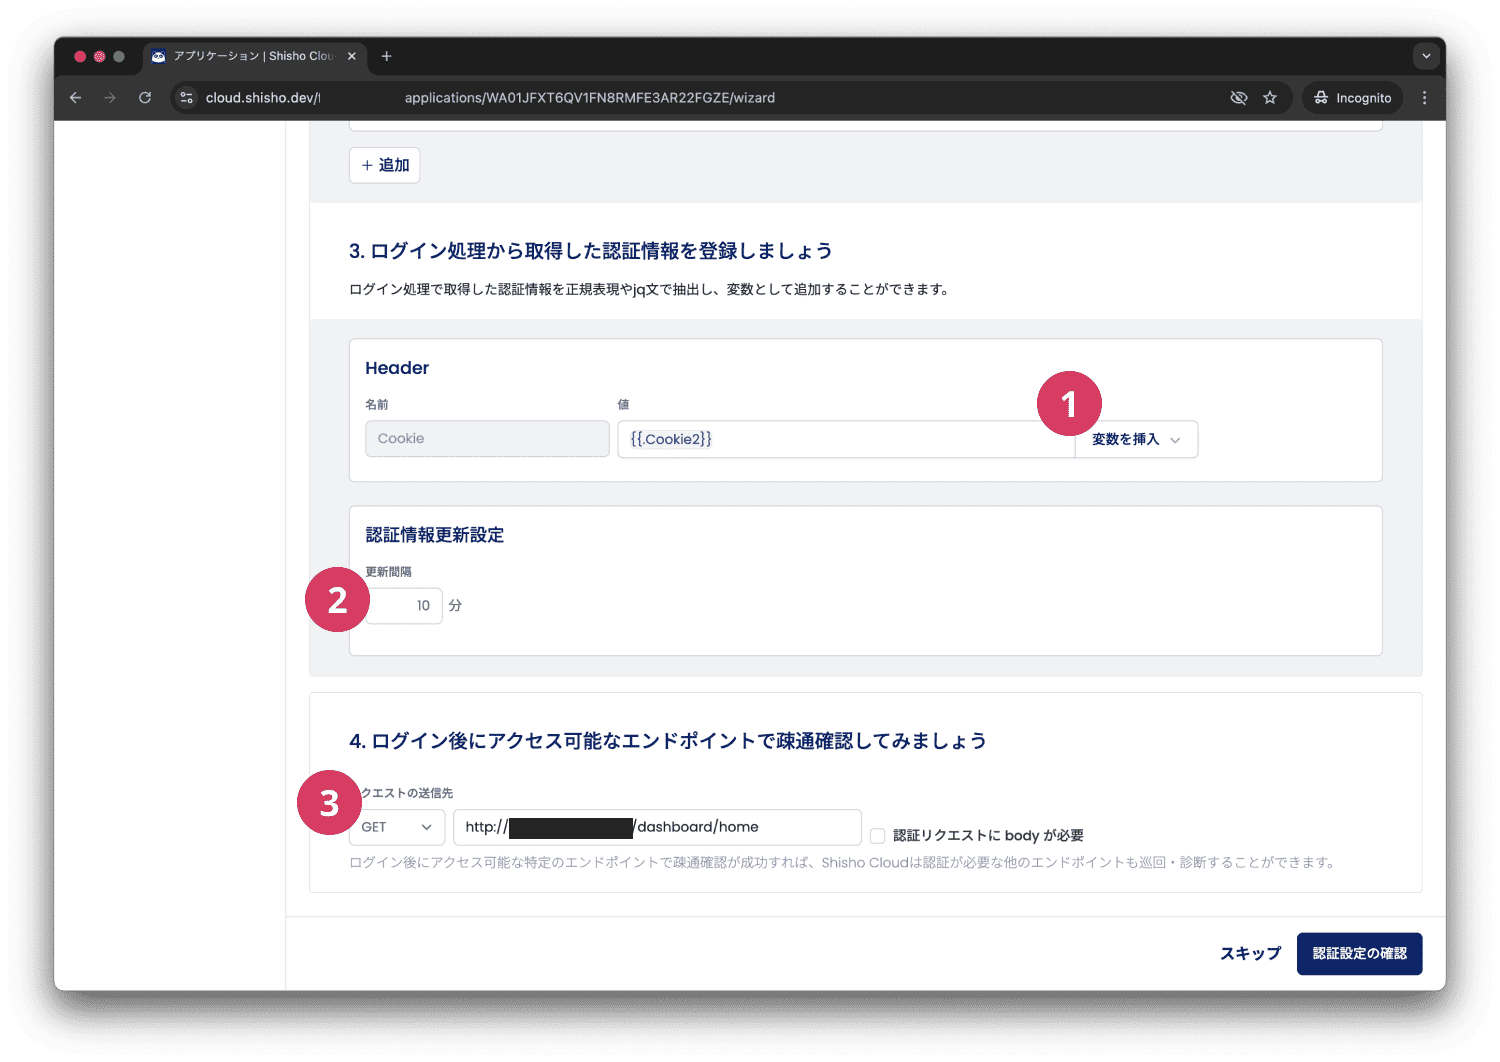
Click “(1) Insert Variable,” then follow the steps described in "About Variables" to insert a value extracted from the login process.
Configuring the Authentication Information Update Interval
Next, set the (2) update interval for the session or authentication token according to when it expires so that Shisho Cloud can always retrieve the latest authentication information.
4. Test Connectivity with a Screen Accessible After Login
Once all settings are complete, test (3) whether an endpoint that requires login can be accessed successfully.
The endpoint you set here is only used to confirm that authentication succeeded. Any endpoint requiring login will do—feel free to choose one arbitrarily.

If the access test succeeds for an endpoint behind the login, your authentication settings are complete.
Configure Crawling Settings
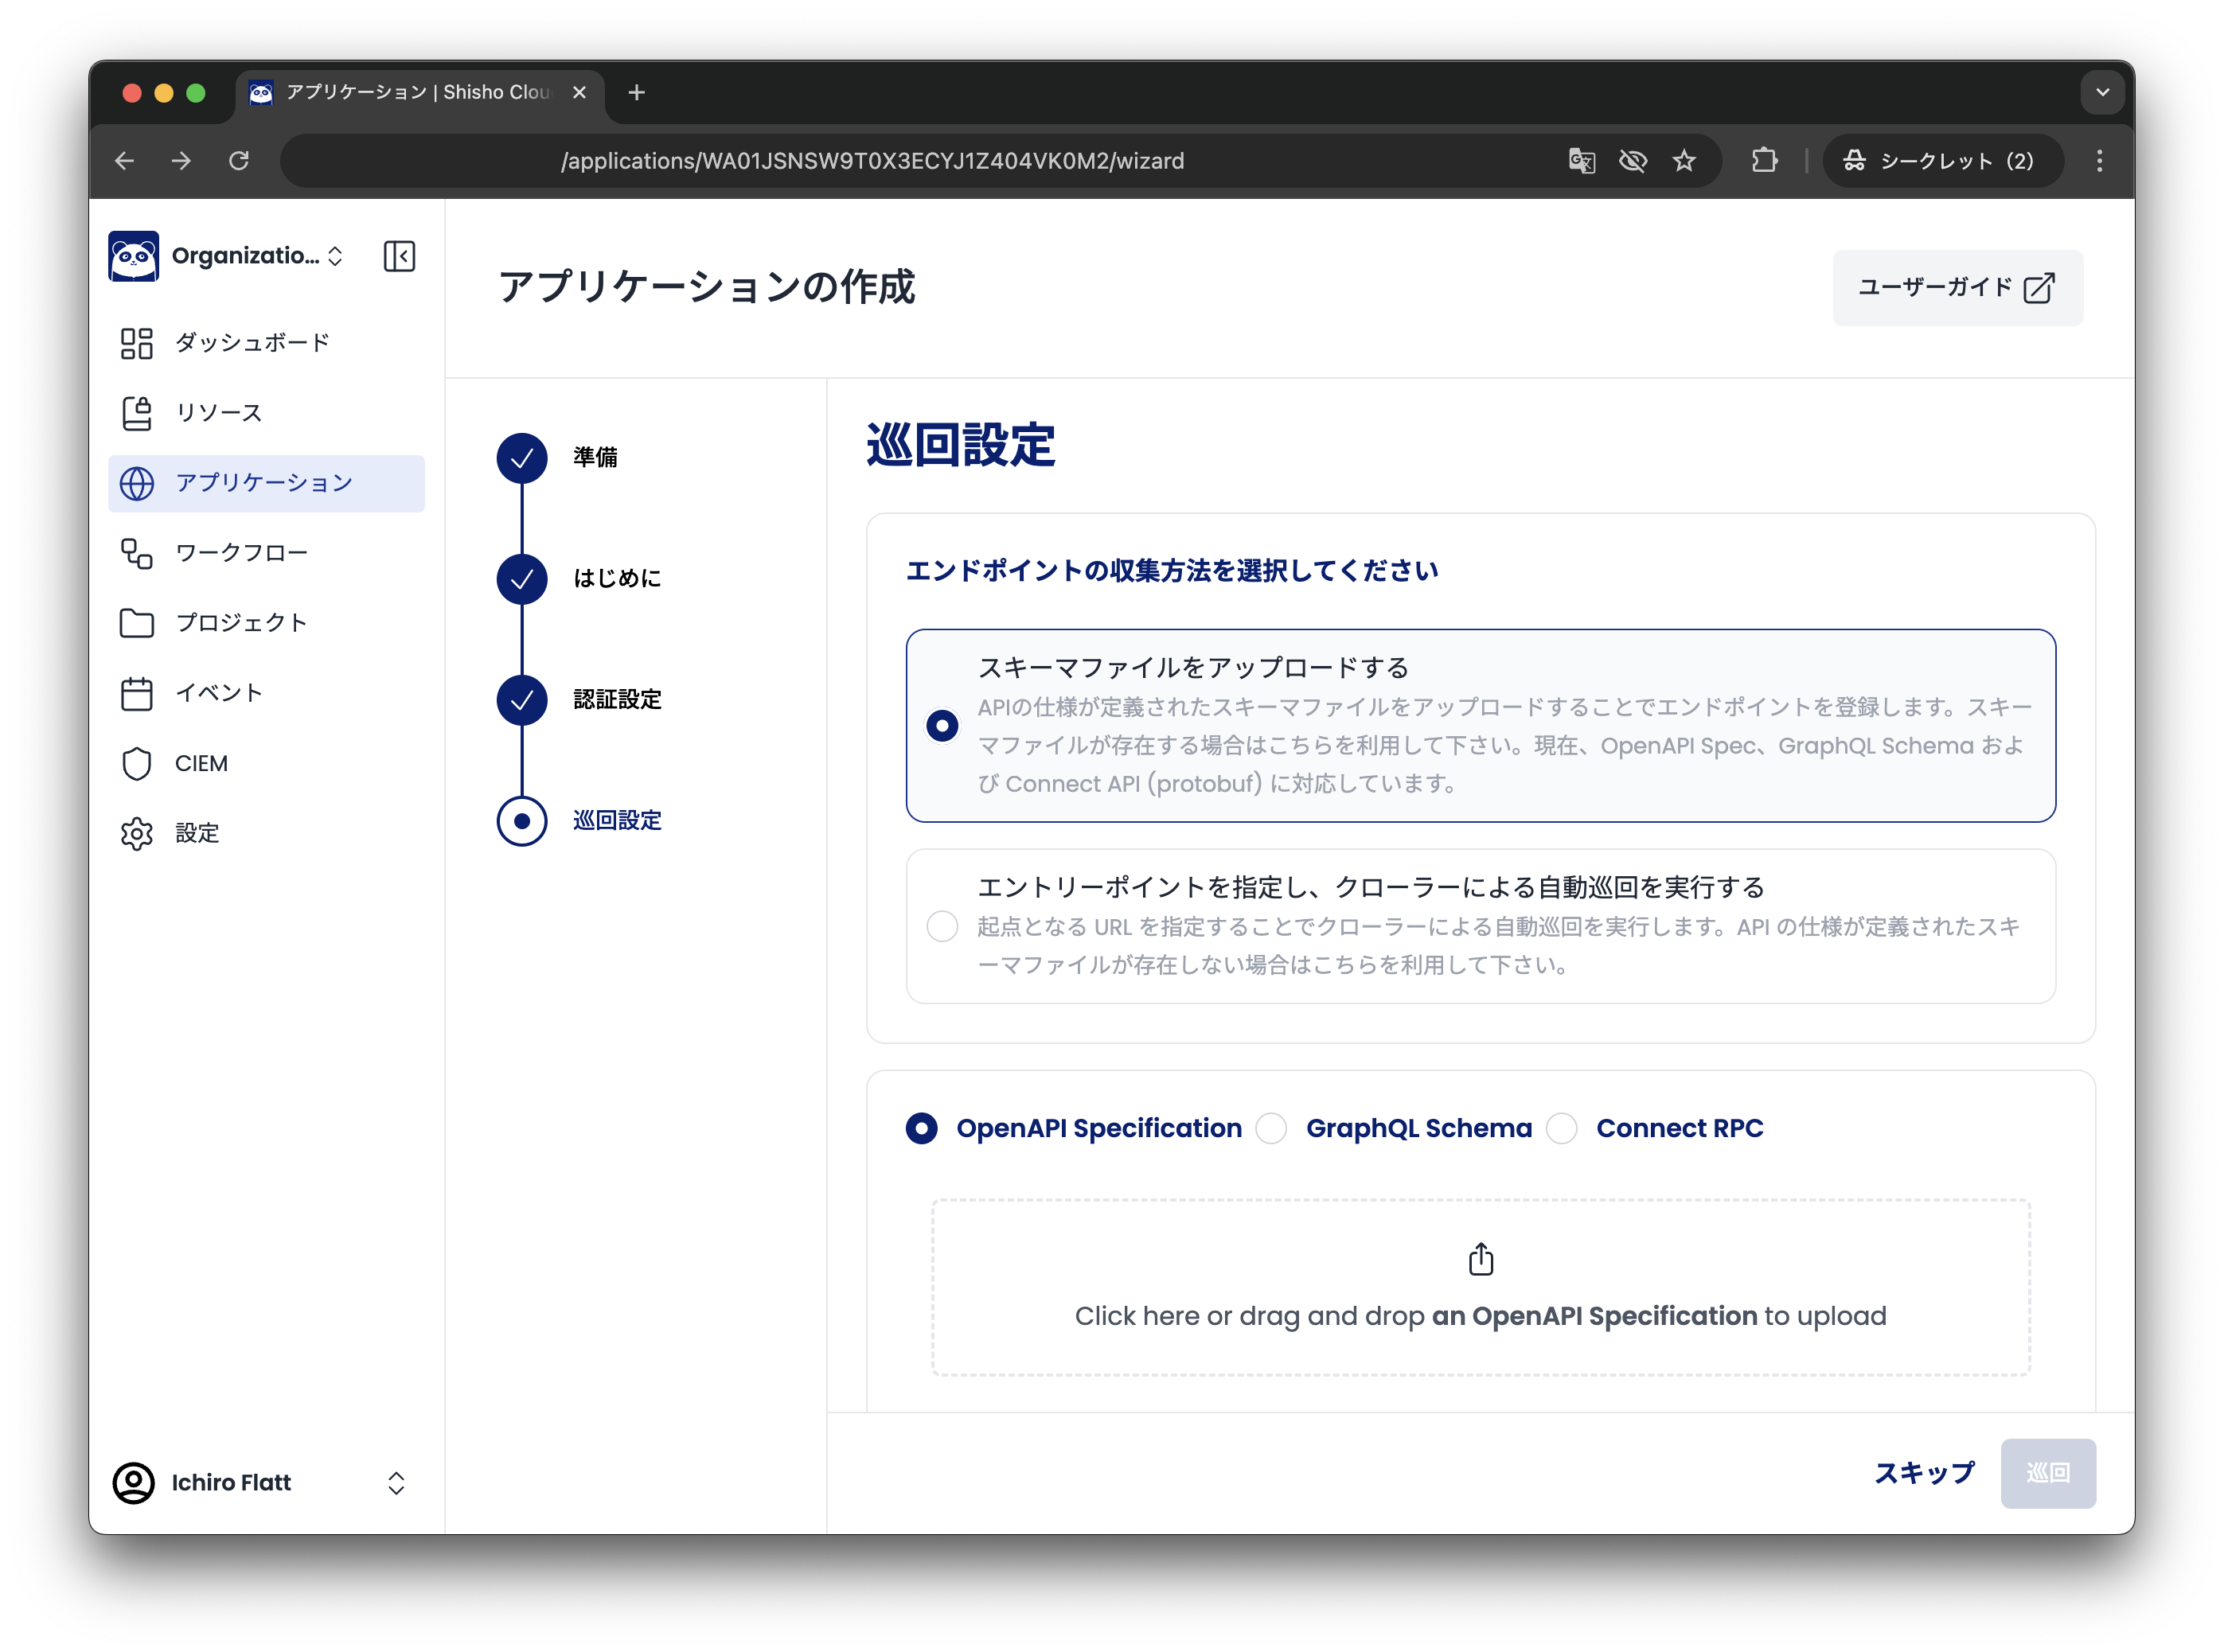
Shisho Cloud provides various methods to discover endpoints of the target application. Please choose the method that best suits the application you want to diagnose.
See the following for more details:
- Import from OpenAPI Specification
- Import from GraphQL Schema
- Import from Connect RPC
- Automatic Crawling
Once the endpoint list is filled, your web application setup is complete.
Frequently Asked Questions
I’m Having Trouble Extracting Variables
It’s possible your regular expression syntax is incorrect. When you run a test, you can see the values of variables extracted at each step. Also, if you’re supposed to extract from the Body but you set the extraction target to the Header, extraction will fail. Double-check where you’re extracting from.
Combining Variables and Fixed Values in Request Parameters
You can specify something like Bear {{.VariableName}}.
If you only need to send a fixed value, you could specify something like FixedValue.
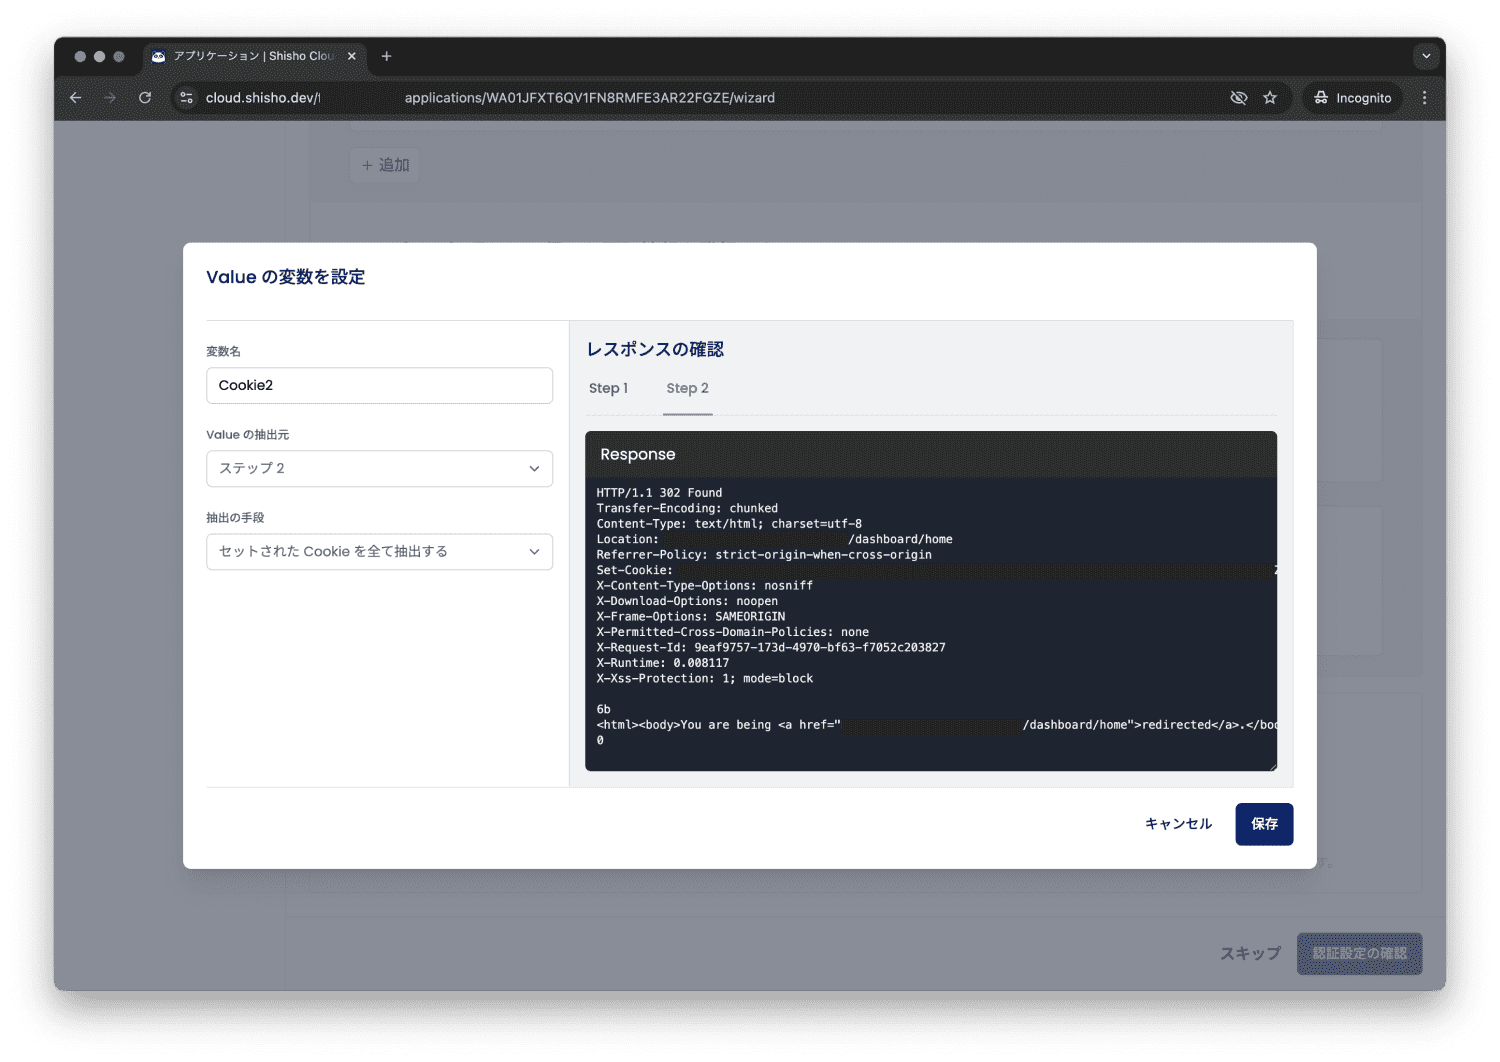
Using a Set-Cookie from the Login Page in the Next Step’s Request
Click “(1) Insert Variable,” then follow the procedure outlined in "About Variables" to create a variable.
Define the variable using “Extract all set Cookies” as the extraction method, then specify it in your request.