Configure Authorization Policy
The English user guide is currently in beta preview. Most of the documents have been automatically translated from the Japanese version. Should you find any inaccuracies, please reach out to Flatt Security.
The authorization control diagnosis function can detect the following authorization control deficiencies.
- Authorization control deficiencies in multi-tenant applications
- For example, "A user belonging to one tenant can access data in another tenant."
- Role-based access control deficiencies
- For example, "A function that can only be used by users with administrator privileges can be accessed by general users."
This page describes the setup procedure required to identify these deficiencies.
Configure Tenant Names
To detect "Authorization control deficiencies in multi-tenant applications," the following two authentication settings are required:
- Authentication settings that are used by default during scanning and have a tenant name set.
- Authentication settings with a different tenant name than 1.
Follow the procedure below to register this information.
When Creating a New Authentication Setting
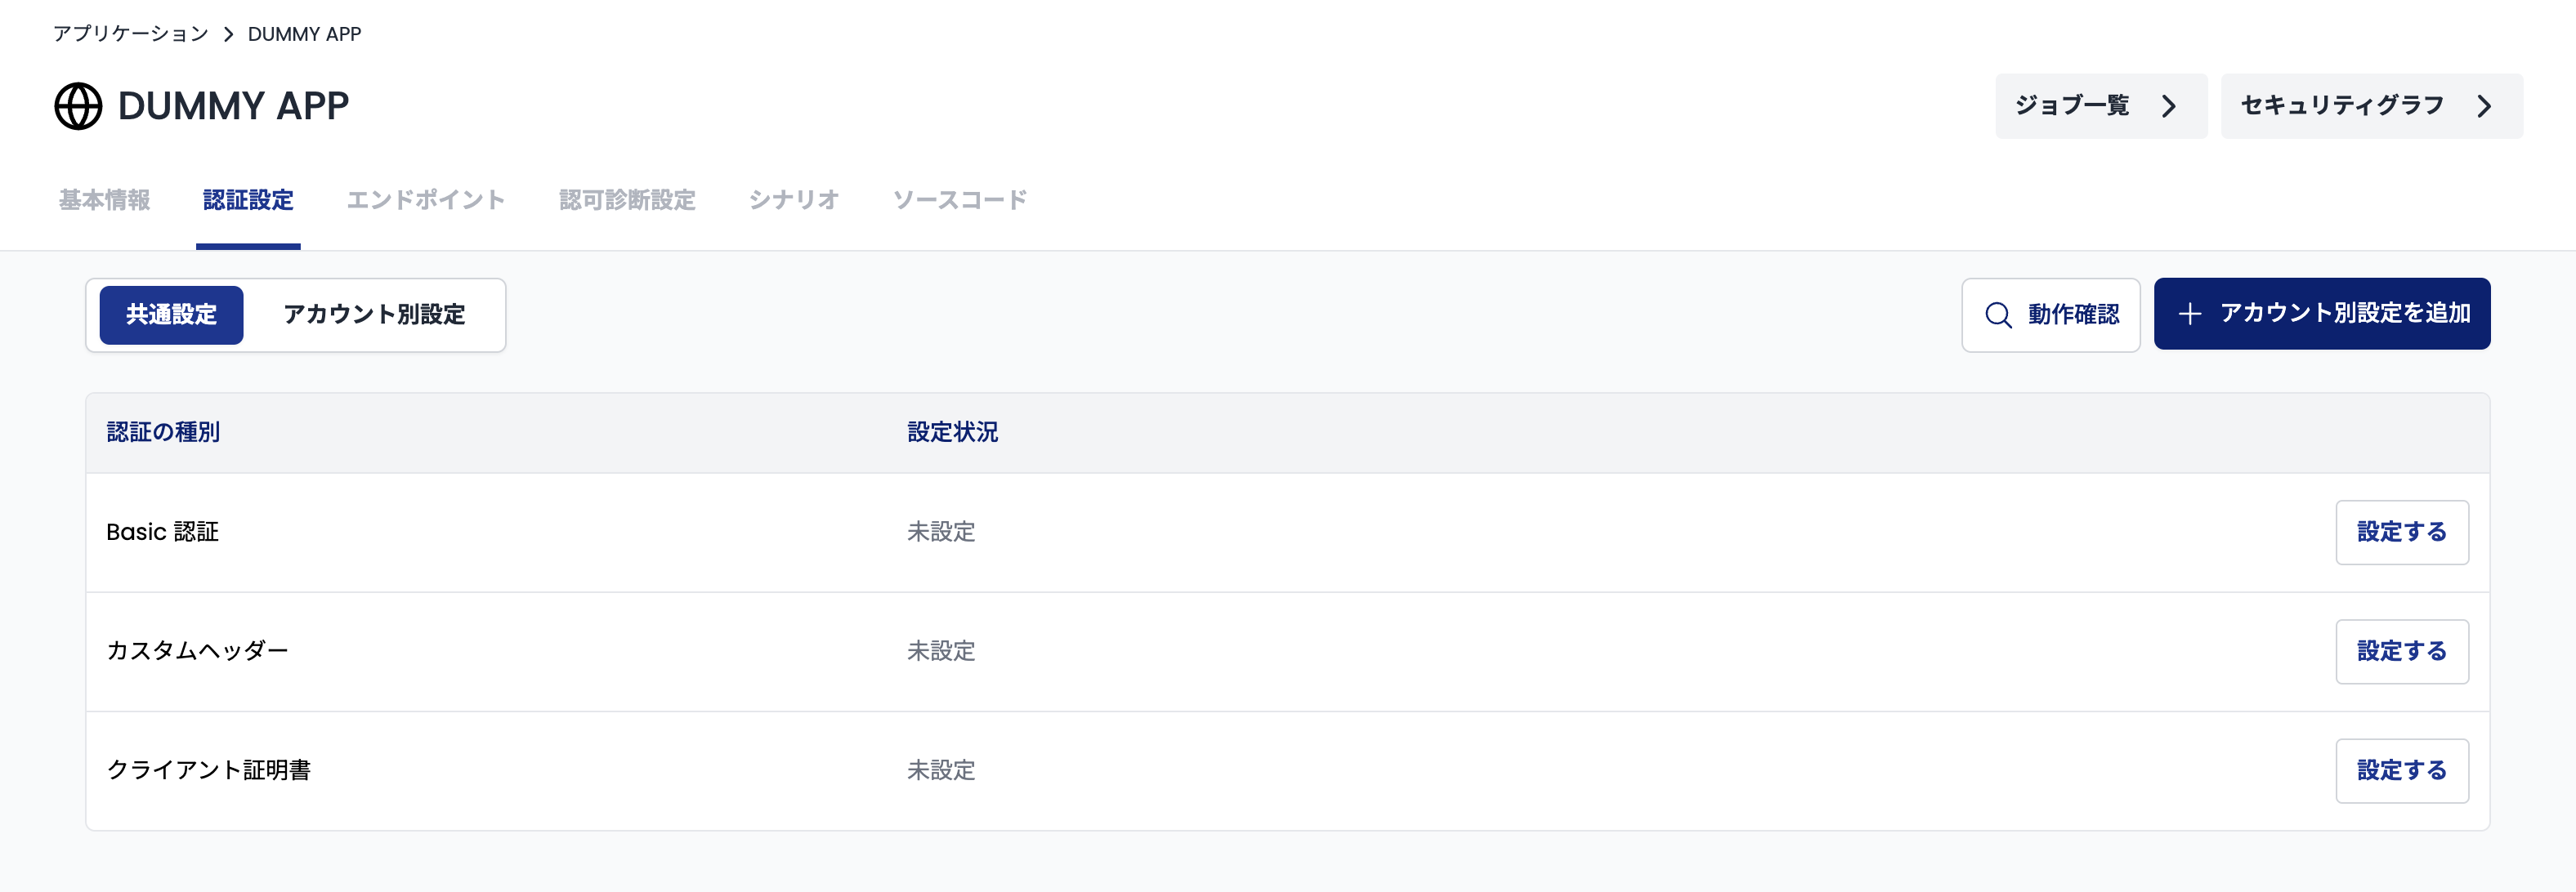
First, go to the "Authentication Settings" page (https://cloud.shisho.dev/[orgid]/applications/[appid]/preconditions) and click the "Add Account-Specific Settings" button.
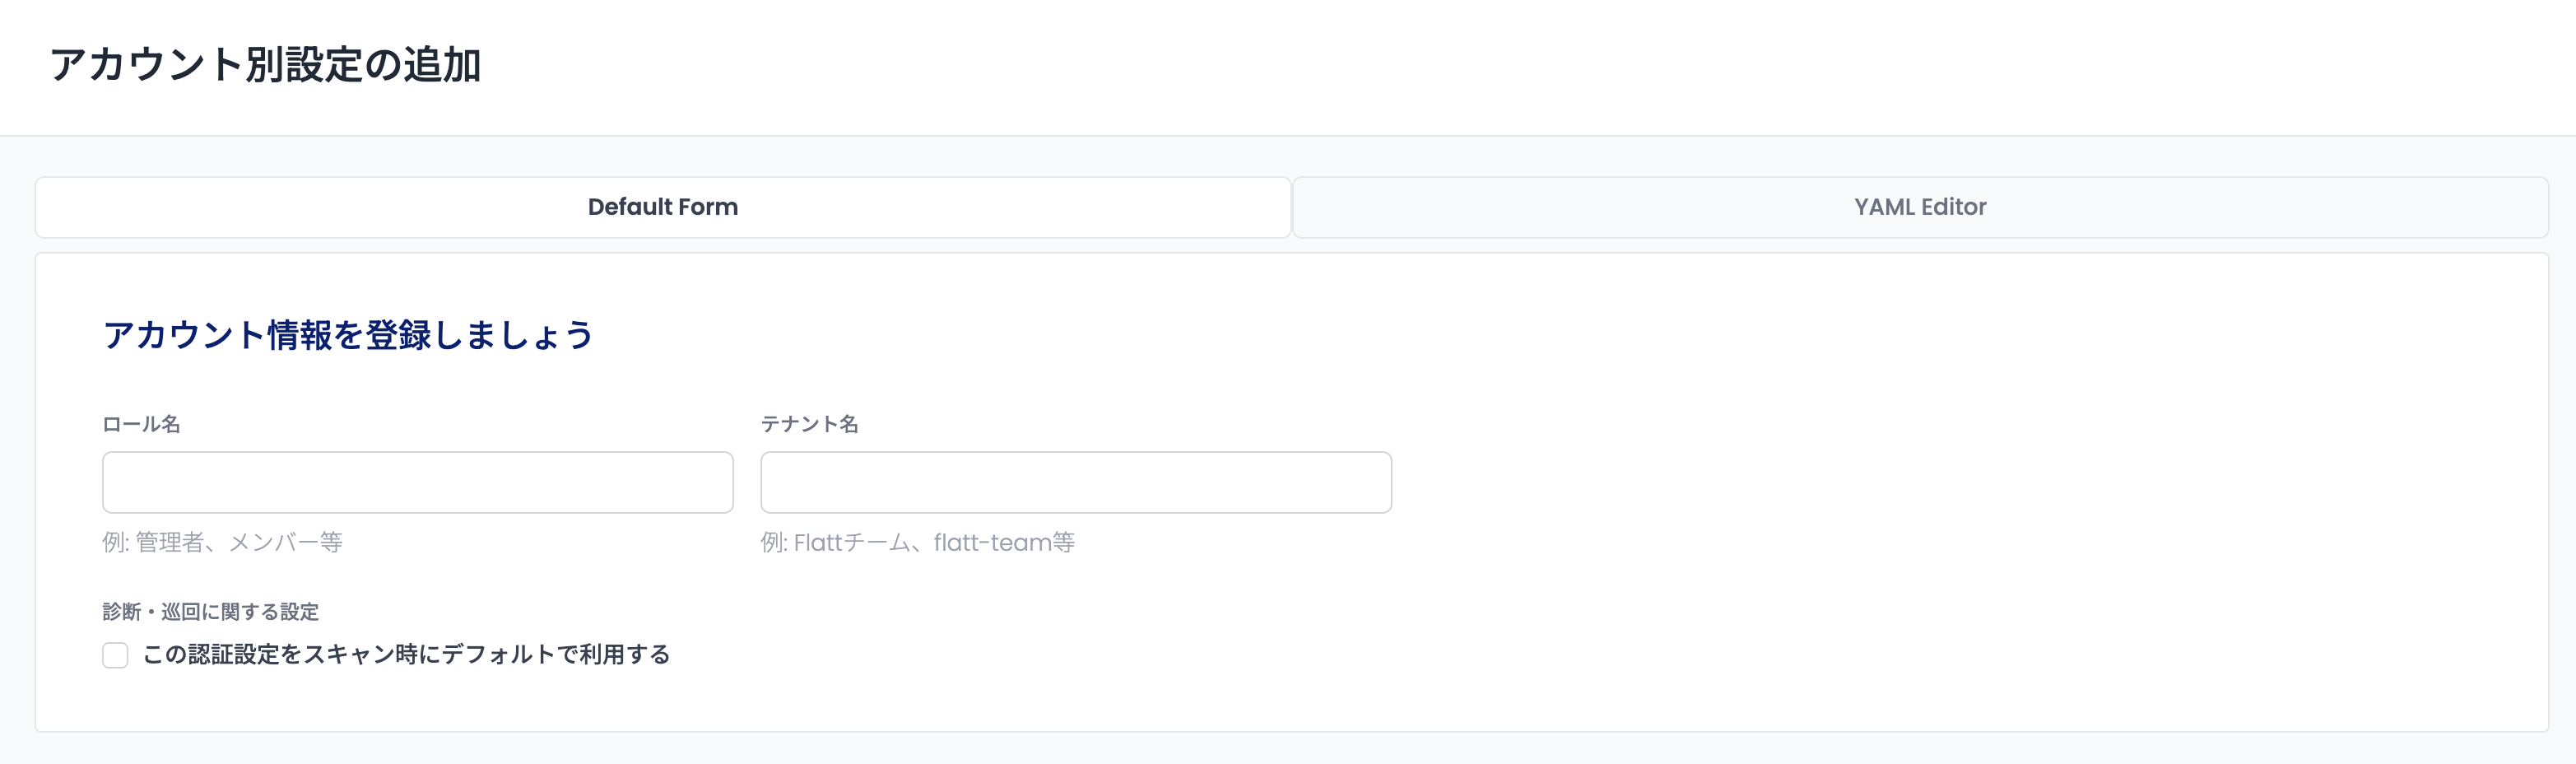
On the page (https://cloud.shisho.dev/[orgid]/applications/[appid]/preconditions/new) that appears after clicking, enter the tenant name to which the account belongs in the "Tenant Name" form. At this time, make sure that the tenant name you enter matches the tenant identifier used in the target application.
Also, if you want to register the account as an authentication setting to be used by default during scanning, check the "Use this authentication setting by default during scanning" checkbox.
For how to create authentication settings, please refer to Initial Web Application Setup Flow.
When Updating an Existing Authentication Setting
First, go to the "Authentication Settings" page (https://cloud.shisho.dev/[orgid]/applications/[appid]/preconditions) and click the "Account Specific Settings" tab.

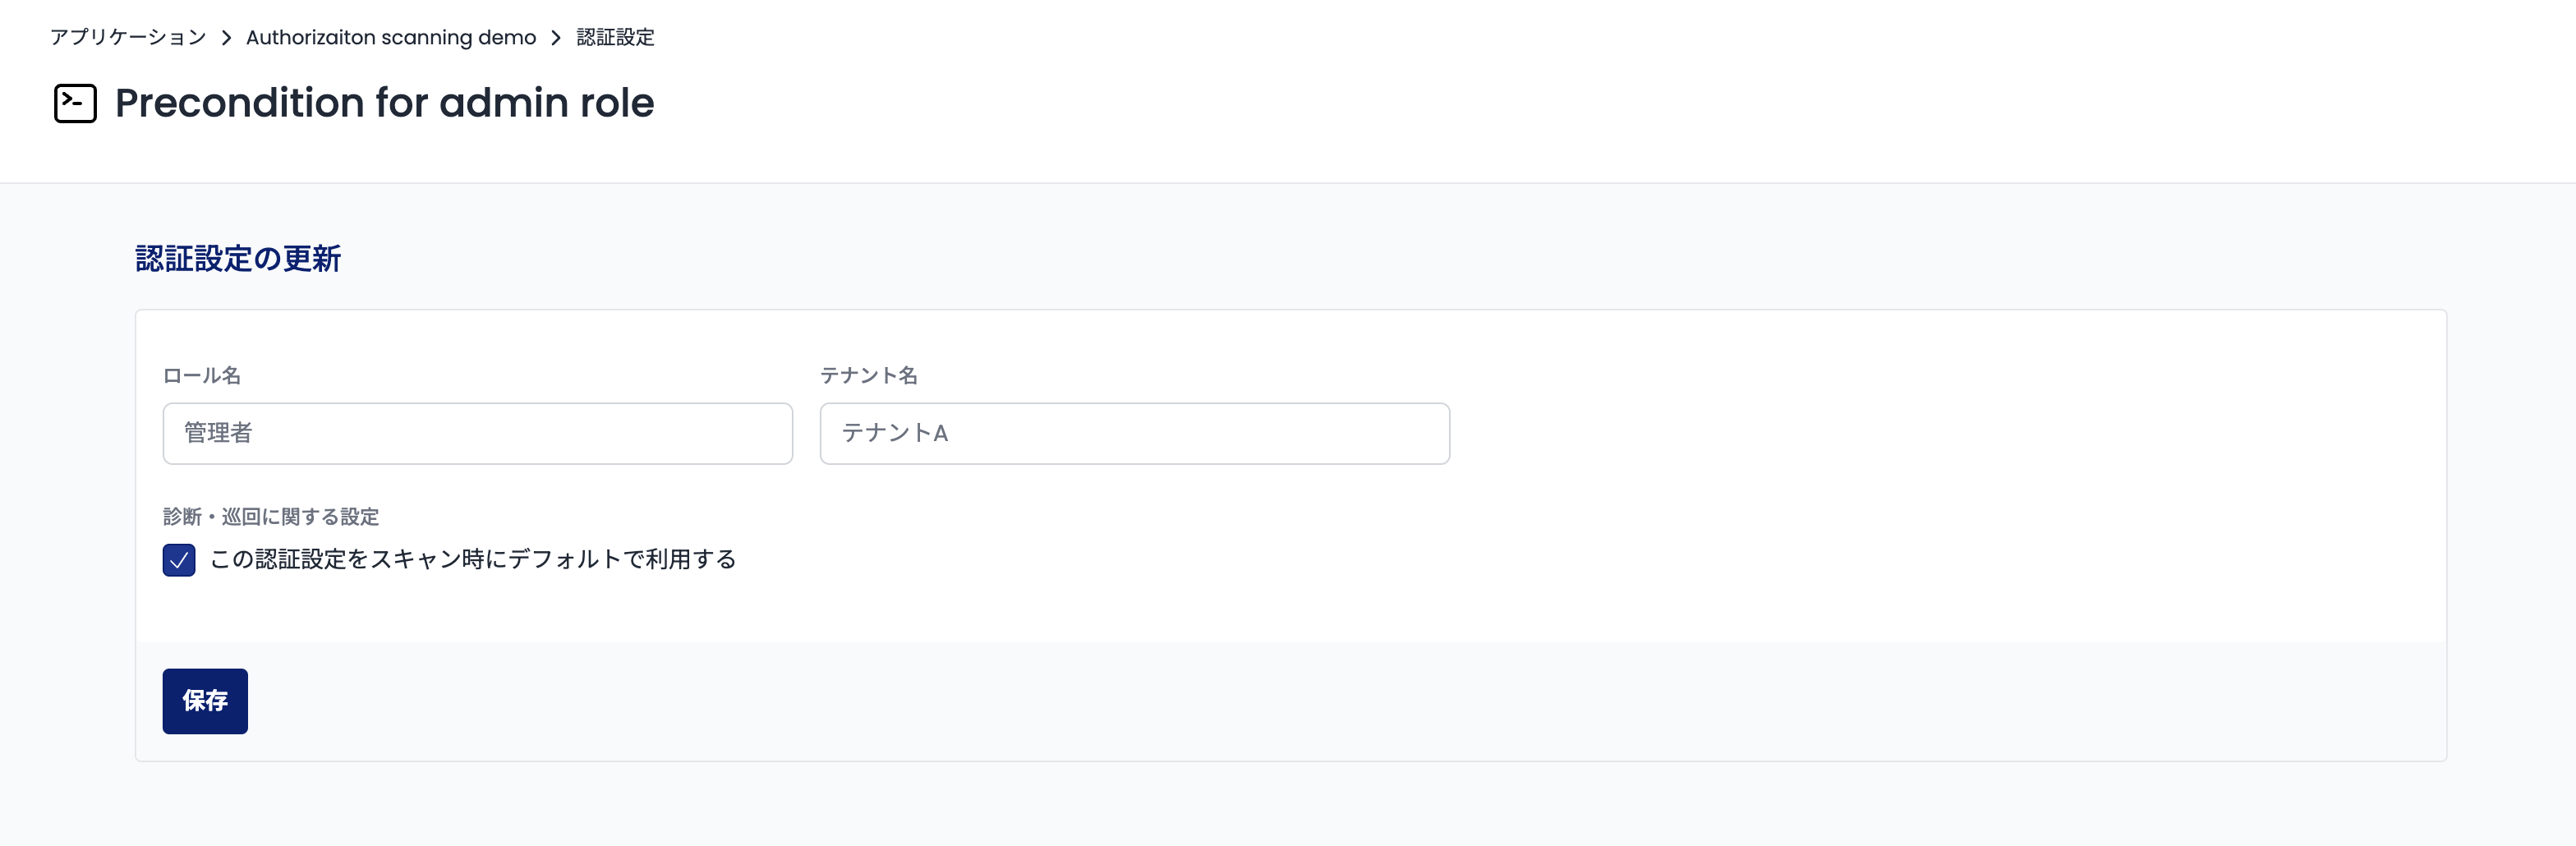
Next, select the authentication setting you want to update in the table that appears and click the "Update" button.
Clicking the "Update" button will display the authentication settings editing screen. On this screen, enter the tenant name to which the account belongs in the "Tenant Name" form. At this time, make sure that the tenant name you enter matches the tenant identifier used in the target application.
When you have finished entering the information, click the "Save" button at the bottom of the screen.
Configure Roles
To detect "Role-Based Access Control Deficiencies," you need an authentication setting with roles set.
Follow the procedure below to register such authentication settings.
When Creating a New Authentication Setting
First, go to the "Authentication Settings" page (https://cloud.shisho.dev/[orgid]/applications/[appid]/preconditions) and click the "Add Account-Specific Settings" button.
On the page (https://cloud.shisho.dev/[orgid]/applications/[appid]/preconditions/new) that appears after clicking, enter the role name assigned to the account in the "Role Name" form.
For how to create authentication settings, please refer to Initial Web Application Setup Flow.
When Updating an Existing Authentication Setting
First, go to the "Authentication Settings" page (https://cloud.shisho.dev/[orgid]/applications/[appid]/preconditions) and click the "Account Specific Settings" tab.
Next, select the authentication setting you want to update in the table that appears and click the "Update" button.
Clicking the "Update" button will display the authentication settings editing screen. On this screen, enter the role name assigned to the account in the "Role Name" form.
When you have finished entering the information, click the "Save" button at the bottom of the screen.
Configure Authorization Policy
Once the authentication settings are complete, proceed to configure the authorization policy. The authorization policy requires you to register the following two pieces of information:
- Authorization Matrix
- Set whether to allow or deny access for each combination of role and endpoint.
- Permission Condition
- It represents the criteria for determining whether a corresponding request is allowed based on the response received.
Configuring the Authorization Matrix
First, go to the "Authorization Diagnosis Settings" page (https://cloud.shisho.dev/[orgid]/applications/[appid]/authorizationpolicy) and click the "Configure" button.

Next, configure the authorization matrix on the page that appears (https://cloud.shisho.dev/[orgid]/applications/[appid]/authorizationpolicy/edit/matrix). On this page, you can set "which endpoints to target for diagnosis" and "whether to allow access for a combination of an endpoint and a role."
First, check the "Target for Diagnosis" checkbox in the endpoint row you want to target for diagnosis.
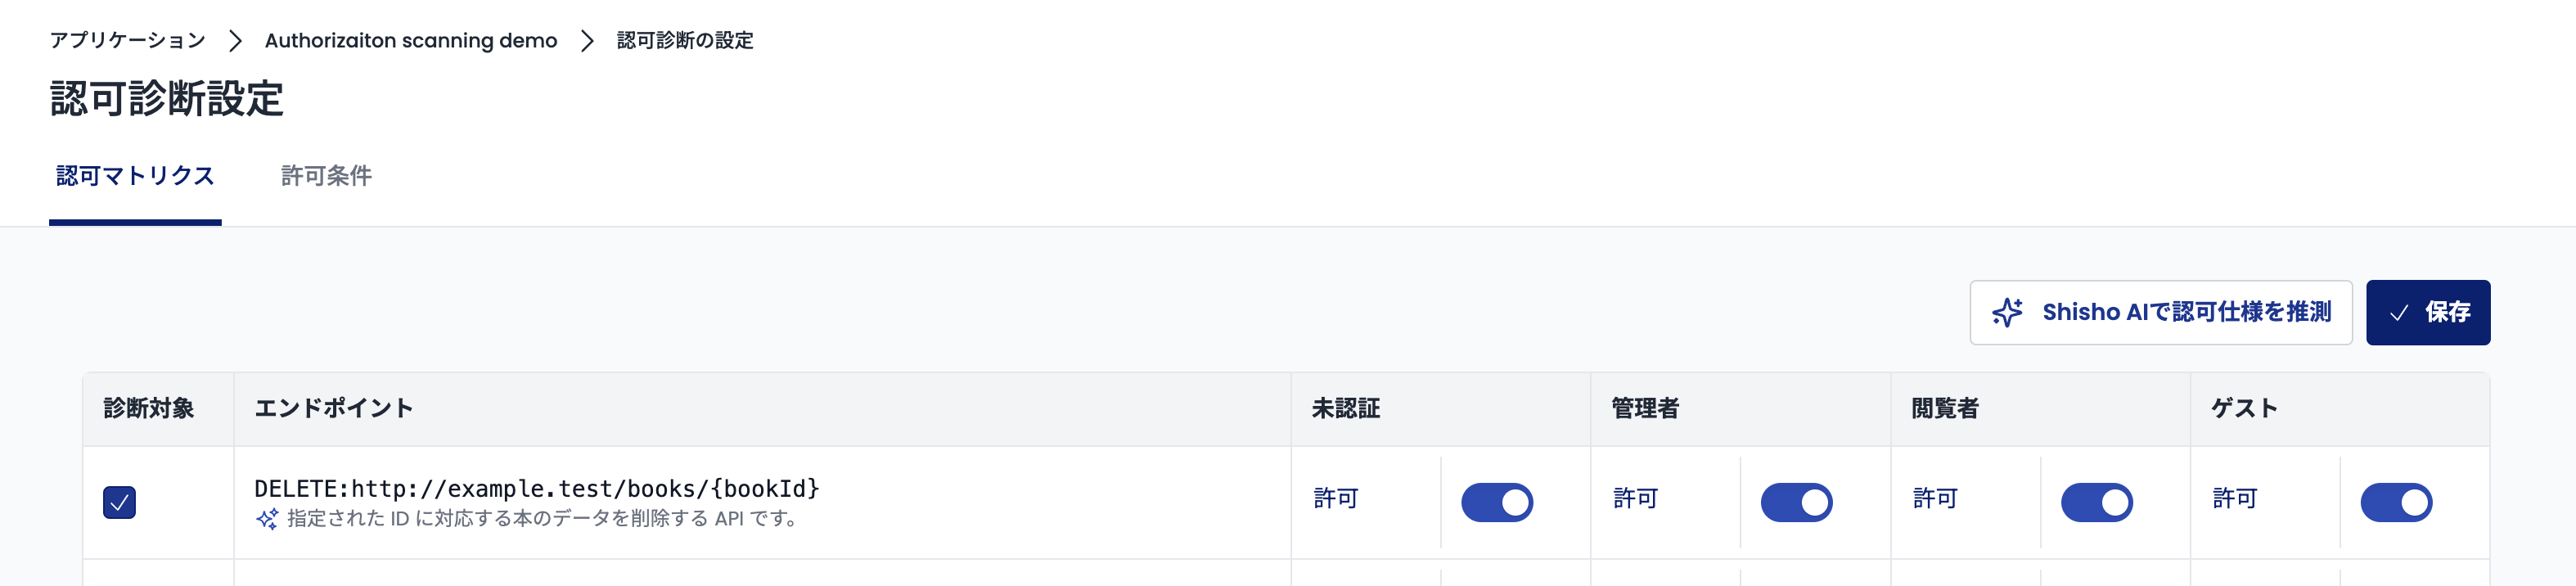
Next, operate the radio buttons in that row and set "Allow" or "Deny" for each role. For example, here is an example of setting where DELETE requests to http://example.test/books/{bookId} should be denied from roles other than admin.
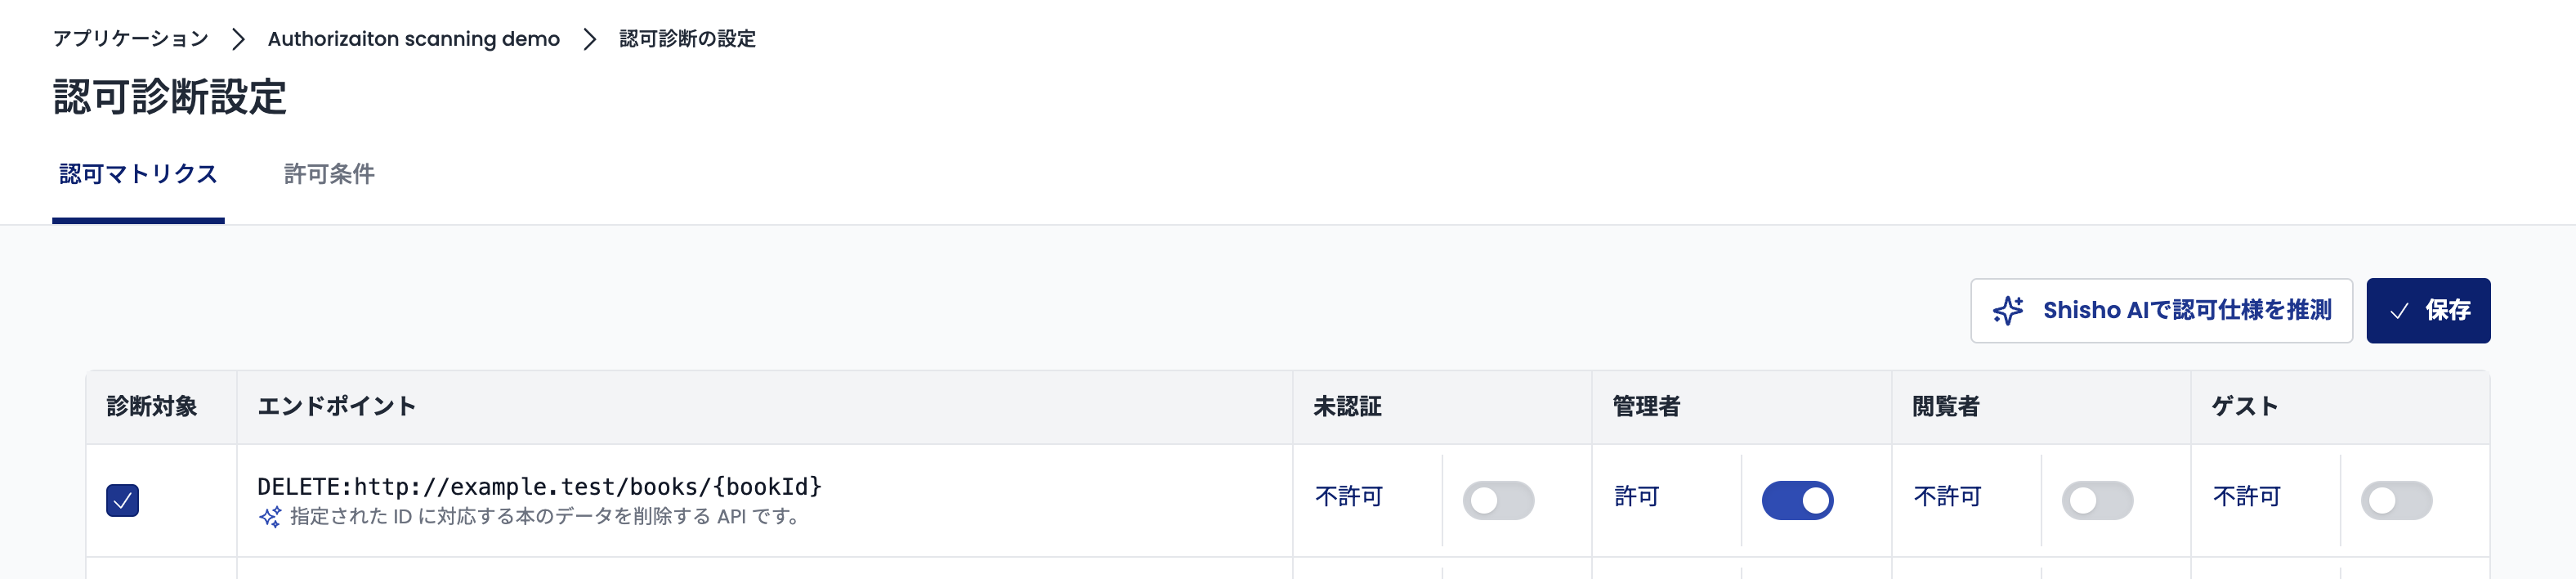
When you have finished setting, click the "Save" button in the upper right corner of the screen.
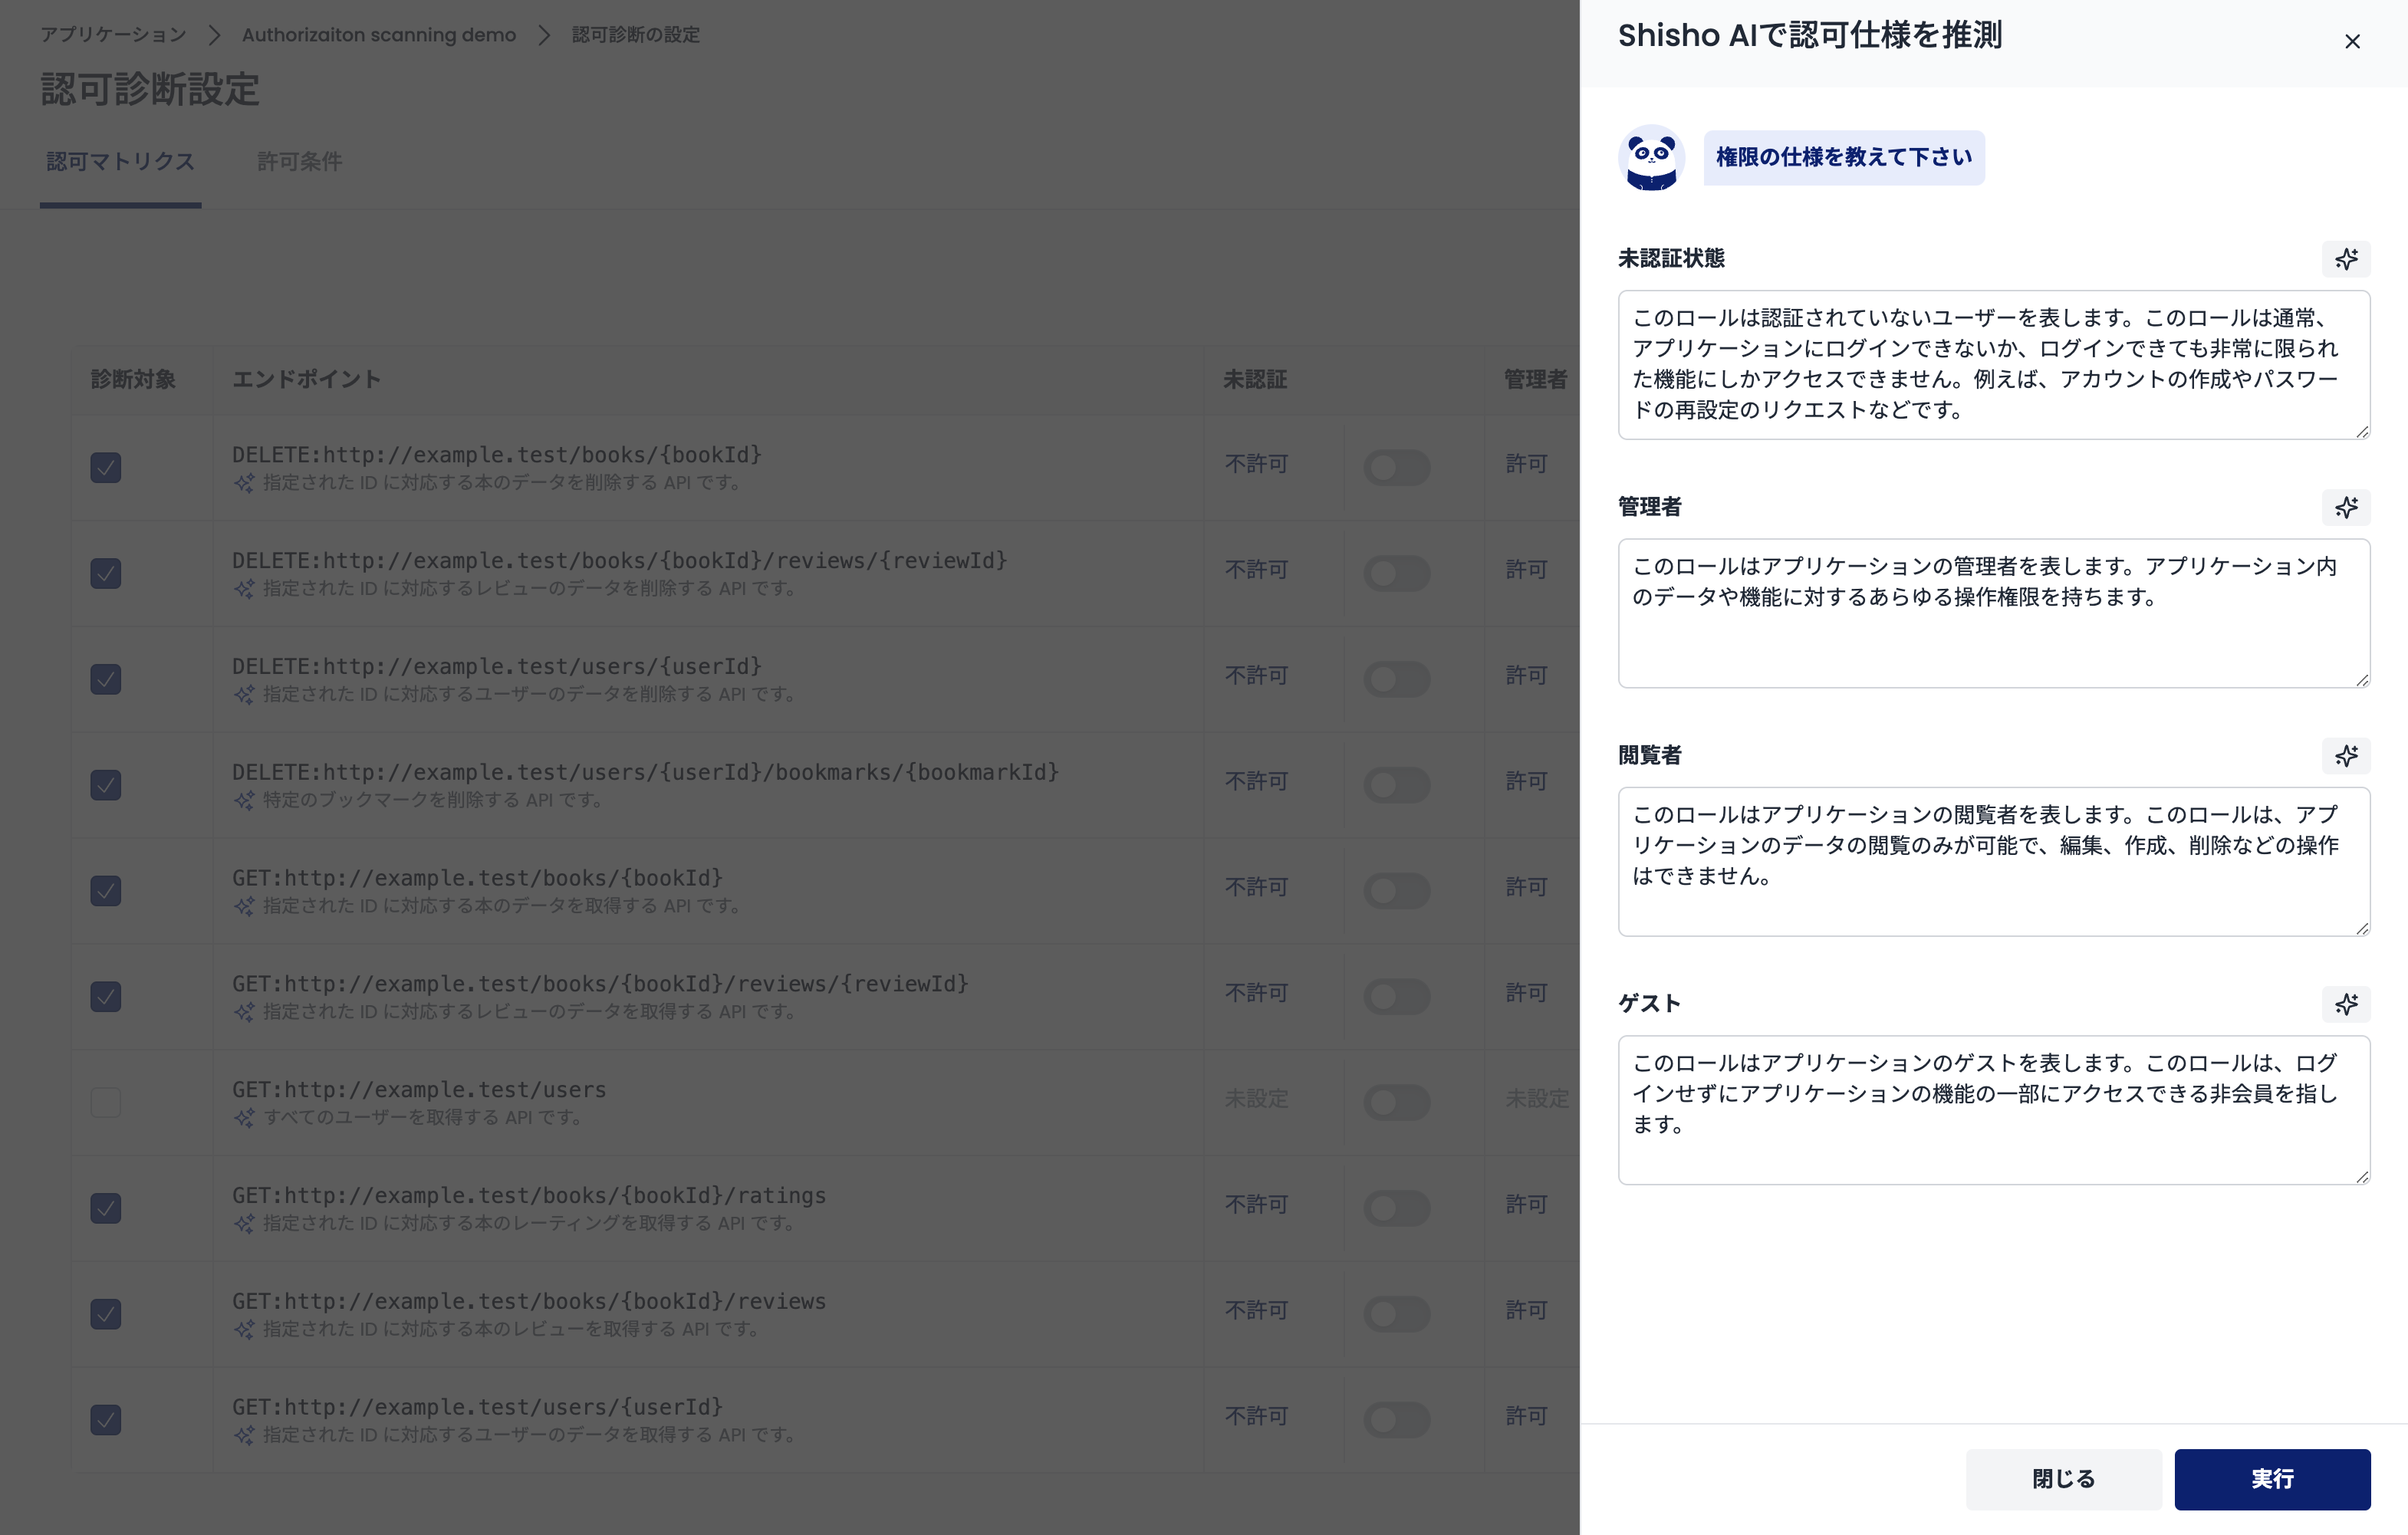
Automatic Configuration of the Authorization Matrix Using Shisho AI
When configuring the authorization matrix, you can automatically infer the authorization specification using Shisho AI. Shisho AI analyzes the description of each role and infers whether access to the endpoint should be allowed based on it.
To use Shisho AI, click the "Infer Authorization Specification with Shisho AI" button on the "Authorization Matrix" screen (https://cloud.shisho.dev/[orgid]/applications/[appid]/authorizationpolicy/edit/matrix).

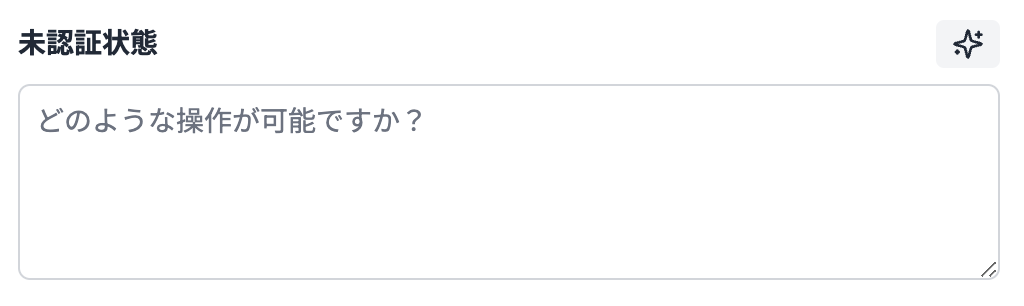
A side over will appear after clicking. A form for entering the description of each role will be displayed in the side over, so enter the description of each role in these forms.
Note that you can ask Shisho AI to generate the description itself. To use this function, click the button at the top right of each form.
When you have finished entering, click the "Execute" button at the bottom of the screen. Shisho AI will analyze the entered description, infer whether access to the endpoint should be allowed based on it, and automatically update the authorization matrix.
Setting Permission Conditions
First, go to the "Authorization Diagnosis Settings" page (https://cloud.shisho.dev/[orgid]/applications/[appid]/authorizationpolicy) and click the "Configure" button.
Next, click the "Permission Condition Tab" on the page that appears, and move to the setting screen (https://cloud.shisho.dev/[orgid]/applications/[appid]/authorizationpolicy/edit/matcher).
You can set the permission conditions on the destination page. The permission conditions can be set based on "whether the response status code matches," "whether the response contains a specific string," and "whether the response matches a regular expression."
You can also set multiple permission conditions, and each condition can be combined with either AND or OR.
For example, the following is an example of setting where a request is determined to be allowed if "the status code is 200 or the response contains the string Success."
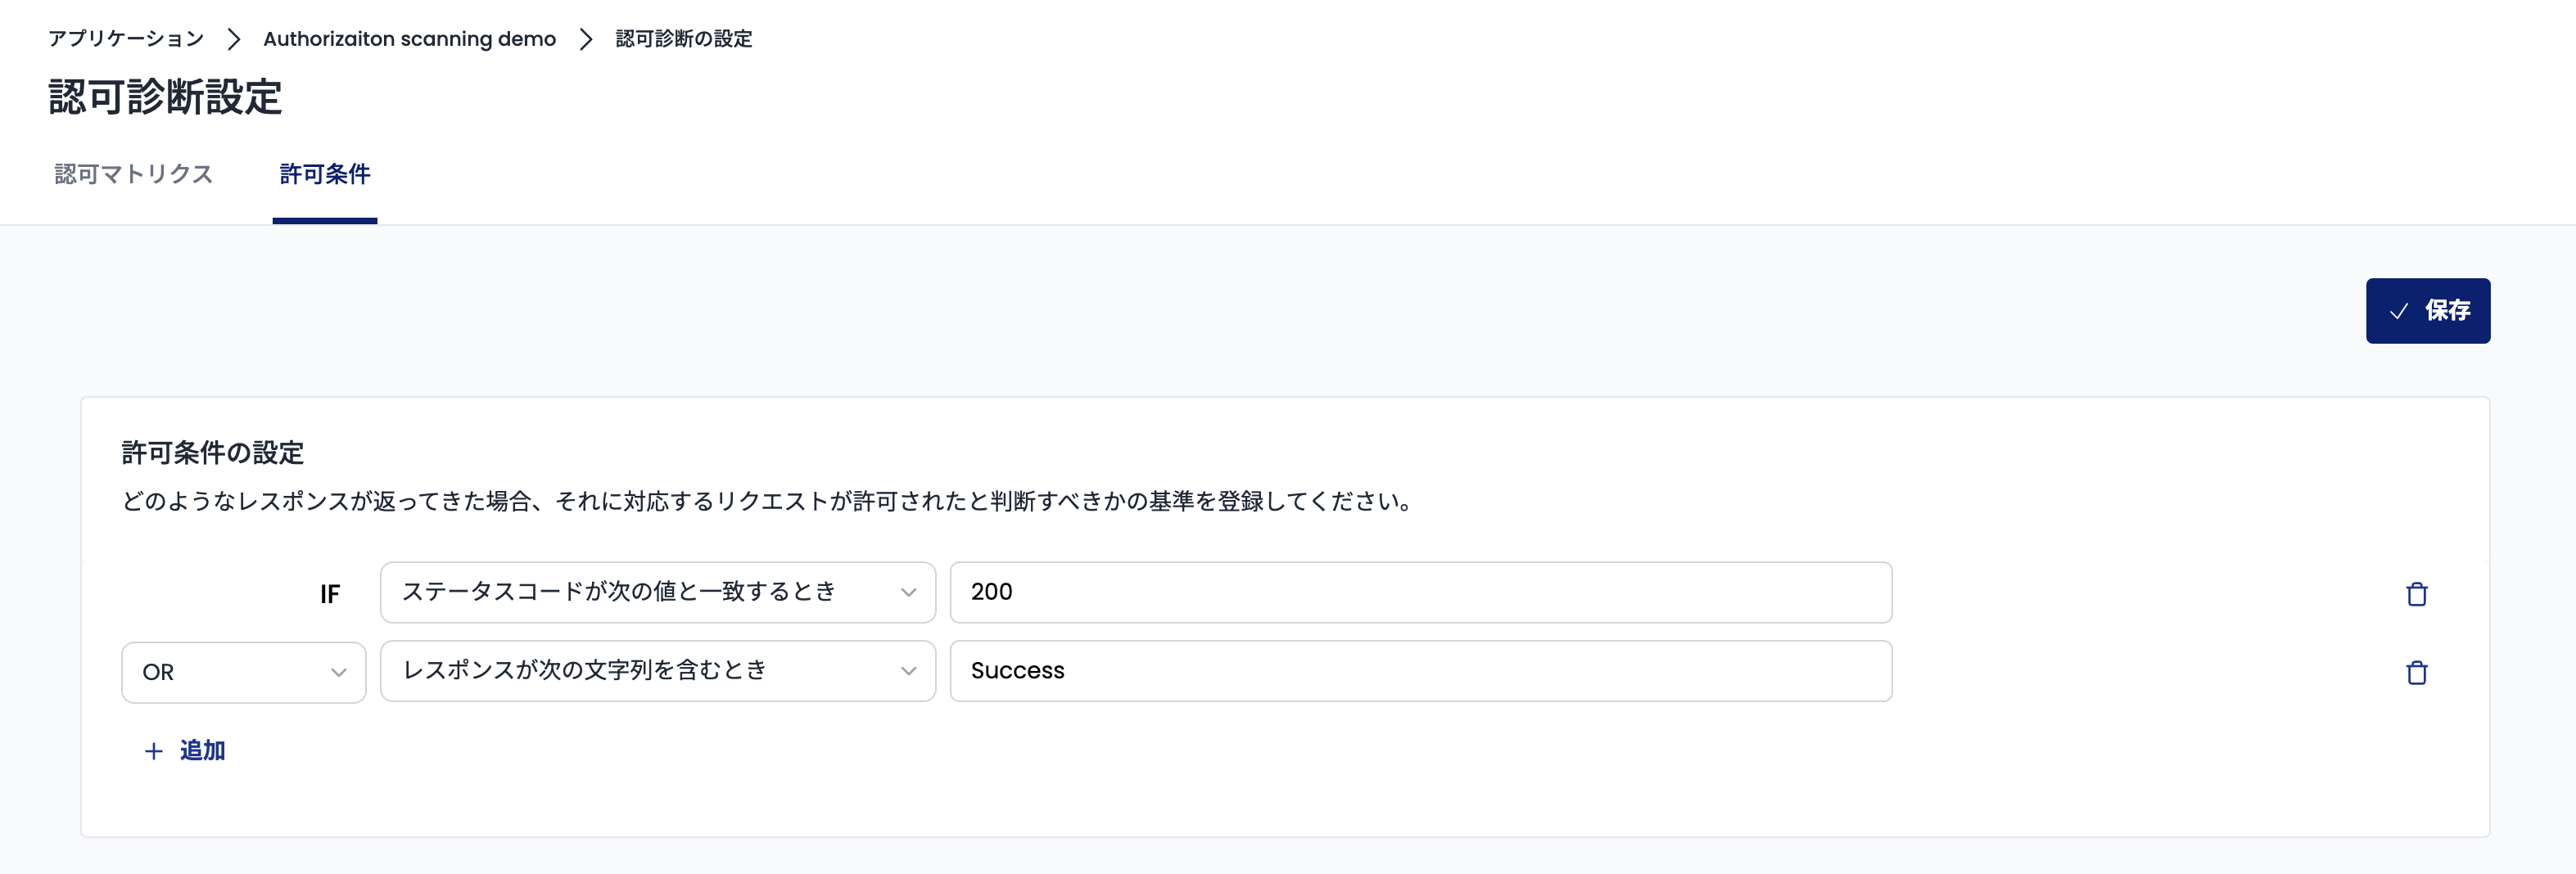
When the setting is completed, click the "Save" button in the upper right corner of the screen.