Integrating cicd-sensor
The English user guide is currently in beta preview. Most of the documents have been automatically translated from the Japanese version. Should you find any inaccuracies, please reach out to Flatt Security.
cicd-sensor is an open-source eBPF runtime security sensor for CI environments such as GitHub Actions. By adding cicd-sensor to a CI/CD job, the job execution can be traced and the trace logs sent to Takumi without using Takumi Runner.
Even when using cicd-sensor on its own, you can configure rules to detect threats and retain trace logs, but integrating with Takumi lets you make far more effective use of the collected trace logs.
Integrating with Takumi enables the following:
- Visualize the trace logs
- Investigate the trace logs from the period of a supply-chain incident with Trace Search
- Use Threat Detection, which detects threats by leveraging our expertise and systems
cicd-sensor rules can be used together with the Takumi integration.
Supported CI/CD pipelines
The cicd-sensor integration does not depend on the execution environment, so as a rule it supports the CI/CD pipelines that cicd-sensor supports. cicd-sensor supports the following CI/CD environments:
- GitHub Actions
- GitHub-hosted runners
- x64
- arm64
- Self-hosted runners
- GitHub-hosted runners
- GitLab CI/CD
- Self-managed runners
Other environments such as third-party runners are also supported. For details, see the cicd-sensor documentation.
cicd-sensor does not support GitLab-hosted runners. It also does not support the ubuntu-slim GitHub-hosted runner.
Sending cicd-sensor trace logs to Takumi
So that cicd-sensor can send trace logs to Takumi, we provide a dedicated cicd-sensor Manager (referred to as "Takumi's Manager" below). The integration is established by specifying Takumi's Manager in cicd-sensor's Manager settings.
Using GitHub-hosted runners
In a GitHub Actions job, specify the Manager with cicd-sensor's manager-url parameter.
jobs:
  build:
    runs-on: ubuntu-24.04
    steps:
      - uses: cicd-sensor/cicd-sensor-action@6511eb44c91d71b2b93d71193b1bf2cb18352f66 # v0.0.38
        with:
          manager-url: https://manager.cicdsensor.cloud.shisho.dev
          manager-token: ${{ secrets.AUTH_TOKEN }} # token setup described below
For the manager-token, see Authentication below.
Using other runners
How to install cicd-sensor differs by CI/CD environment; check the cicd-sensor documentation.
Once cicd-sensor is installed, all that is left is configuring the Manager. To configure the Manager, specify its endpoint manager-url and the credentials manager-token. How to set these also differs by execution environment, so check the cicd-sensor documentation.
Takumi's Manager endpoint and credentials are the following:
manager-url:https://manager.cicdsensor.cloud.shisho.devmanager-token: see Authentication
Authentication
There are two authentication methods: keyless OIDC and API keys. Both use a Shisho Cloud bot.
First, open the bot creation page on Shisho Cloud and create a bot. When creating the bot, make sure to specify the mission specific role Takumi Runner Trace Sender (when creating a bot for pushing rules and config, select the Takumi Runner Config Manager role instead).
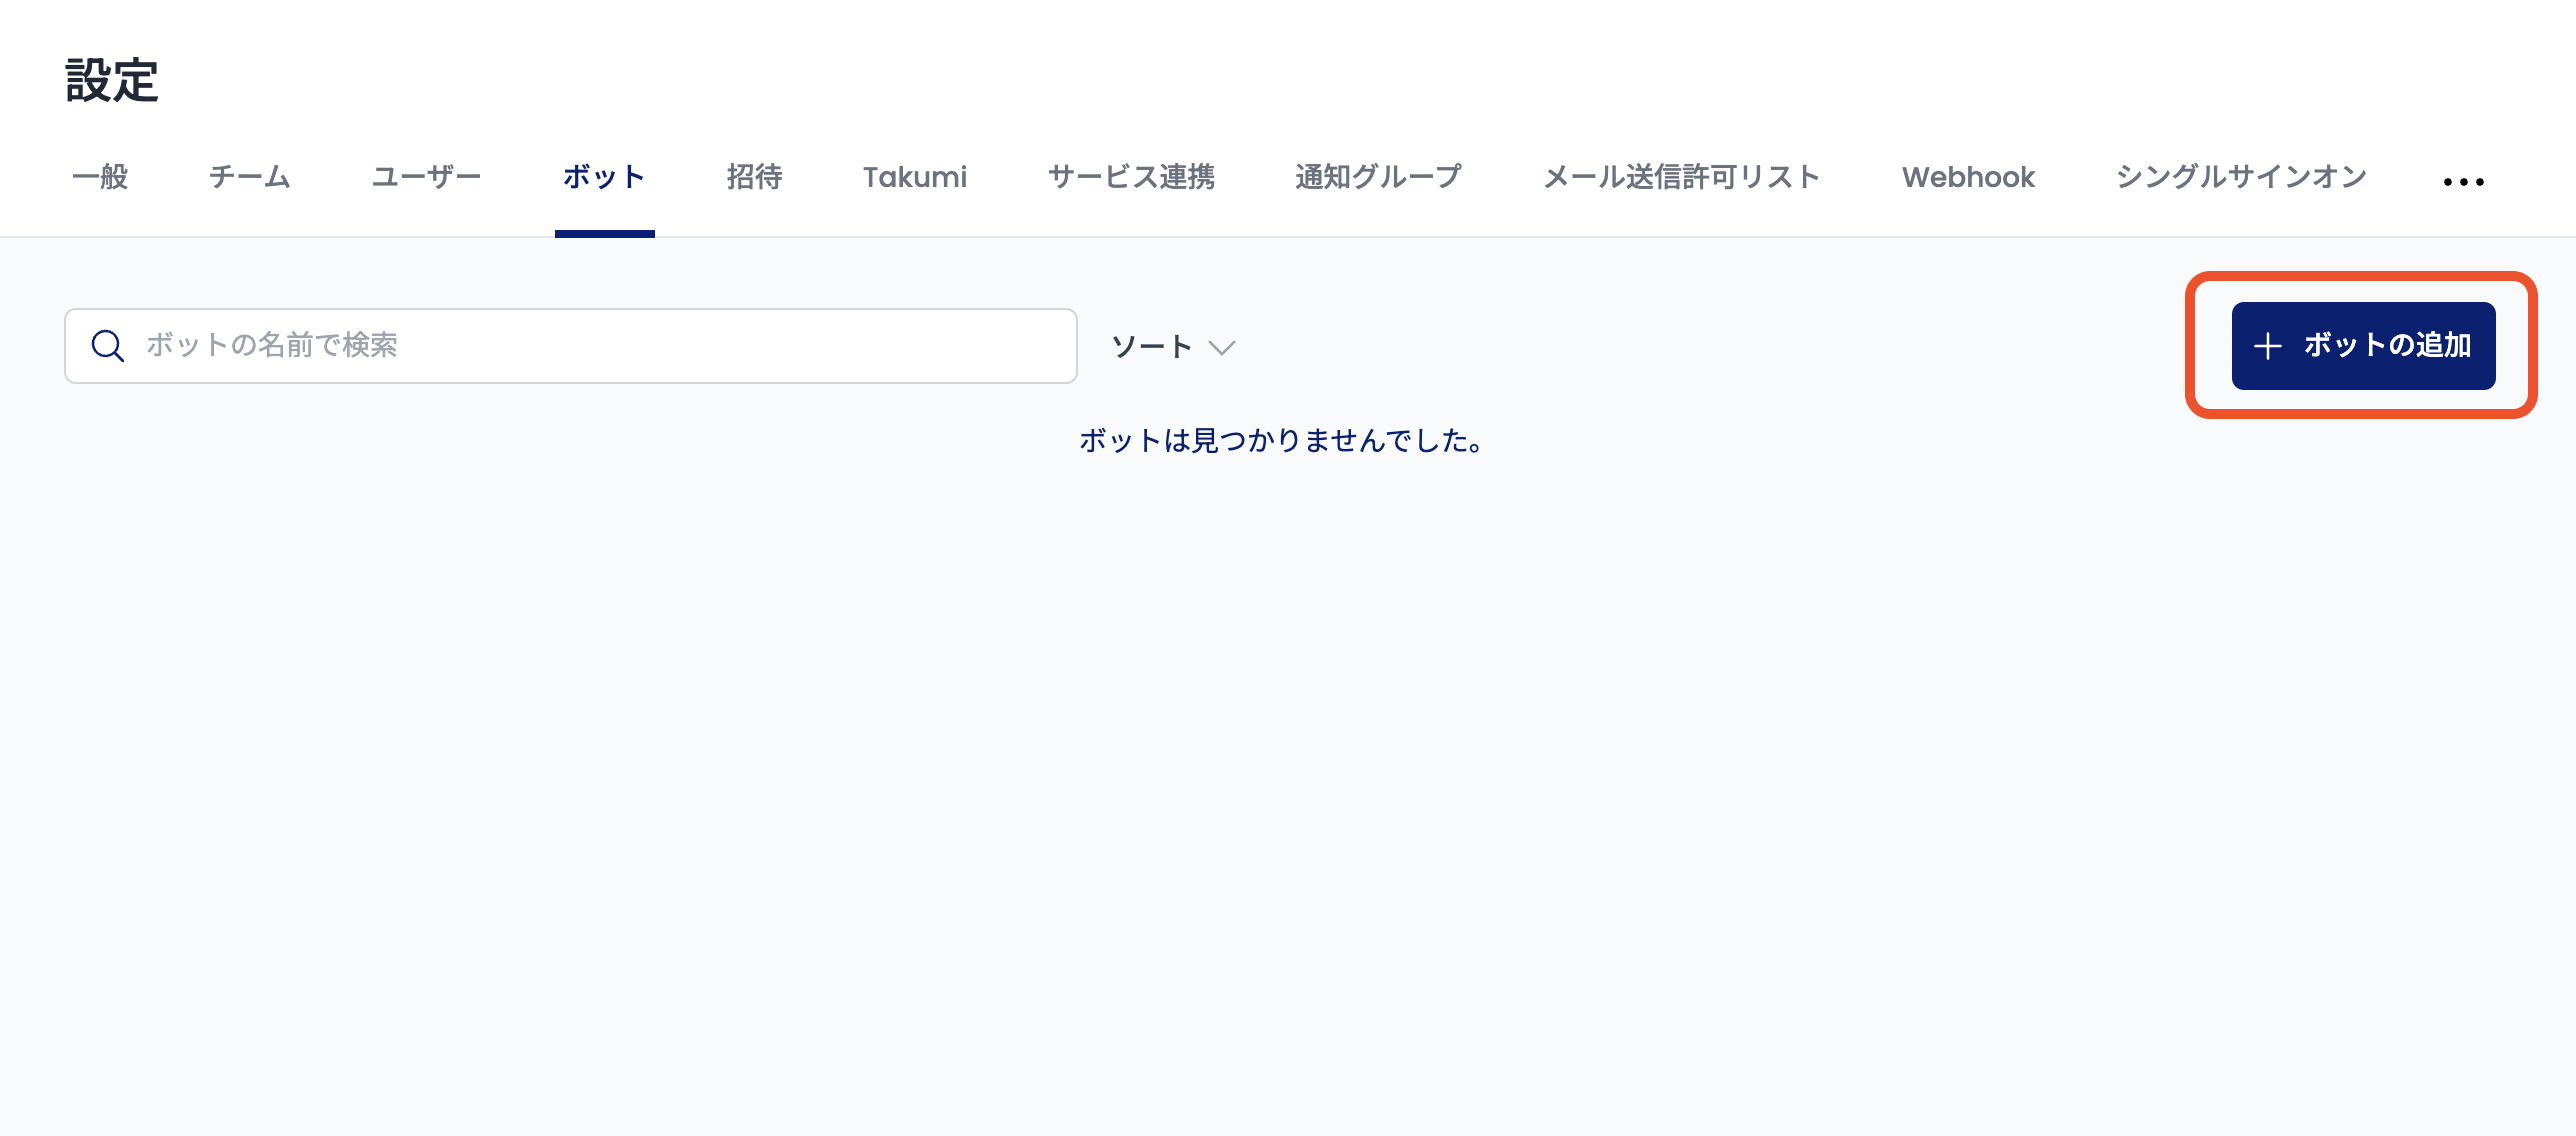
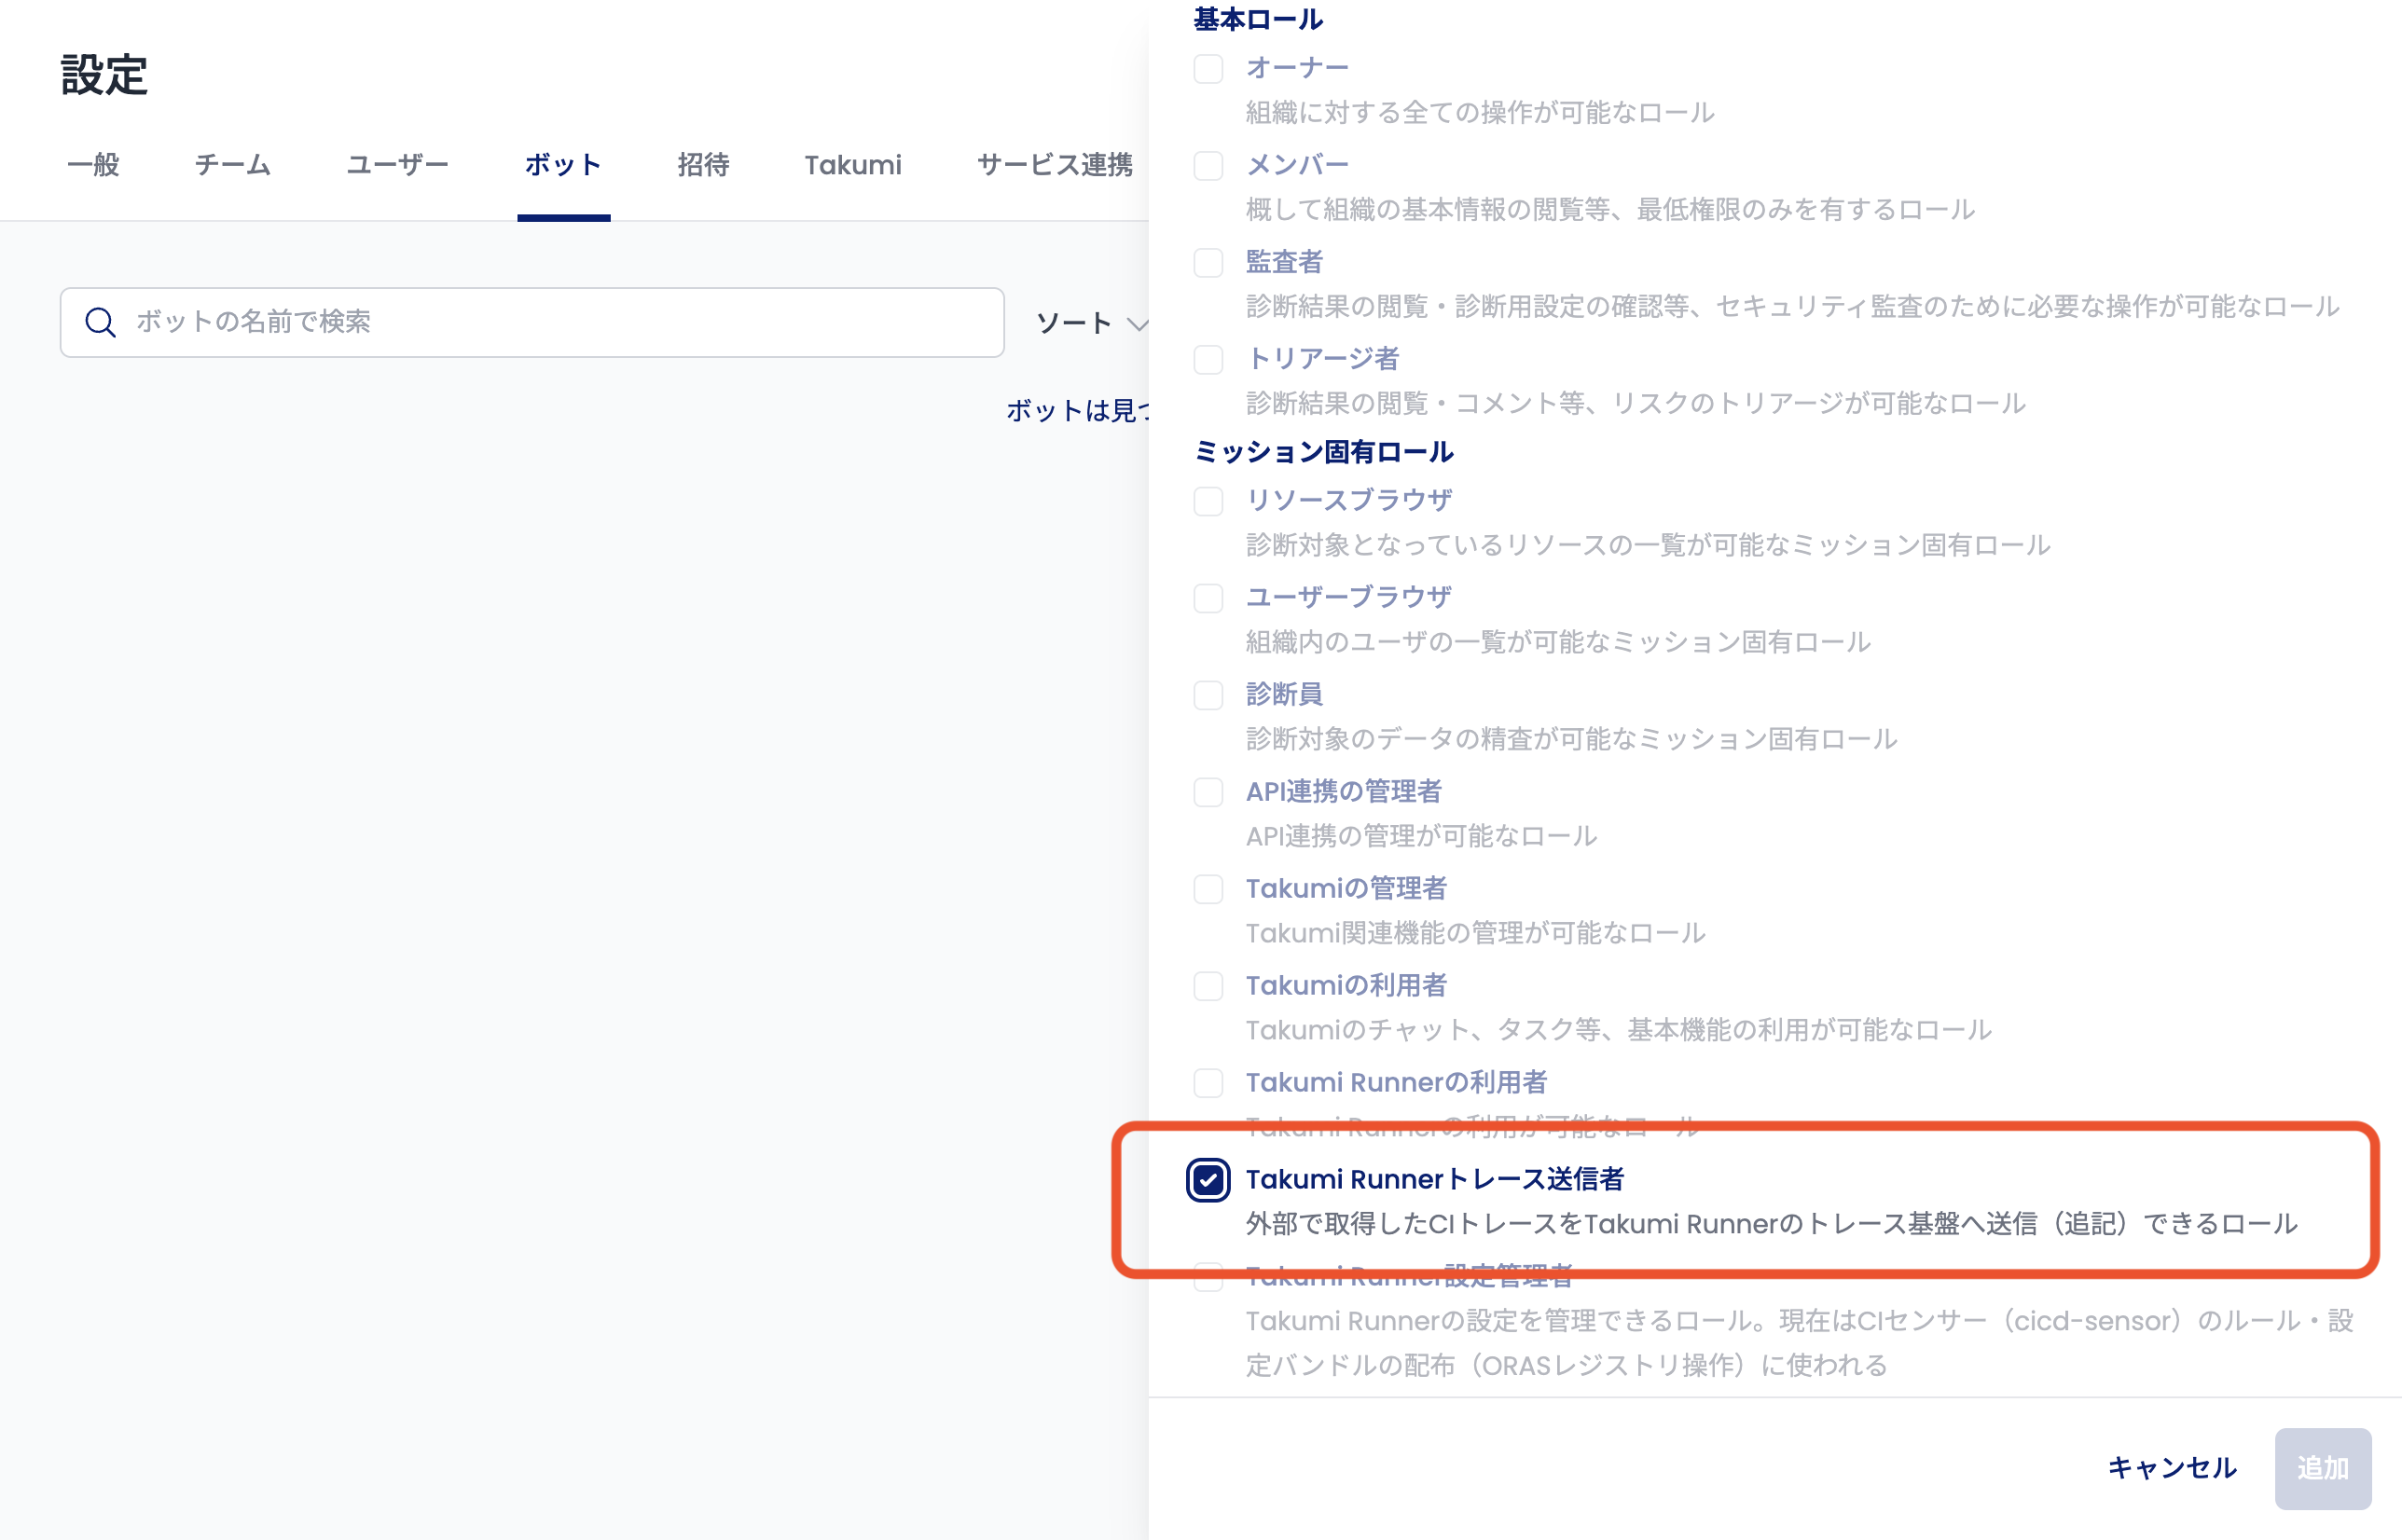
From here, the steps differ depending on whether you set up keyless OIDC or create an API key. Use an API key in environments where OIDC authentication is not possible, such as self-hosted runners.
Option A: keyless authentication with OIDC
With keyless authentication, the workflow obtains a short-lived token at run time and no long-lived secrets are stored in your CI environment.
To set up keyless authentication, create a trust condition for the bot in Shisho Cloud, binding it to your GitHub organization and repository.
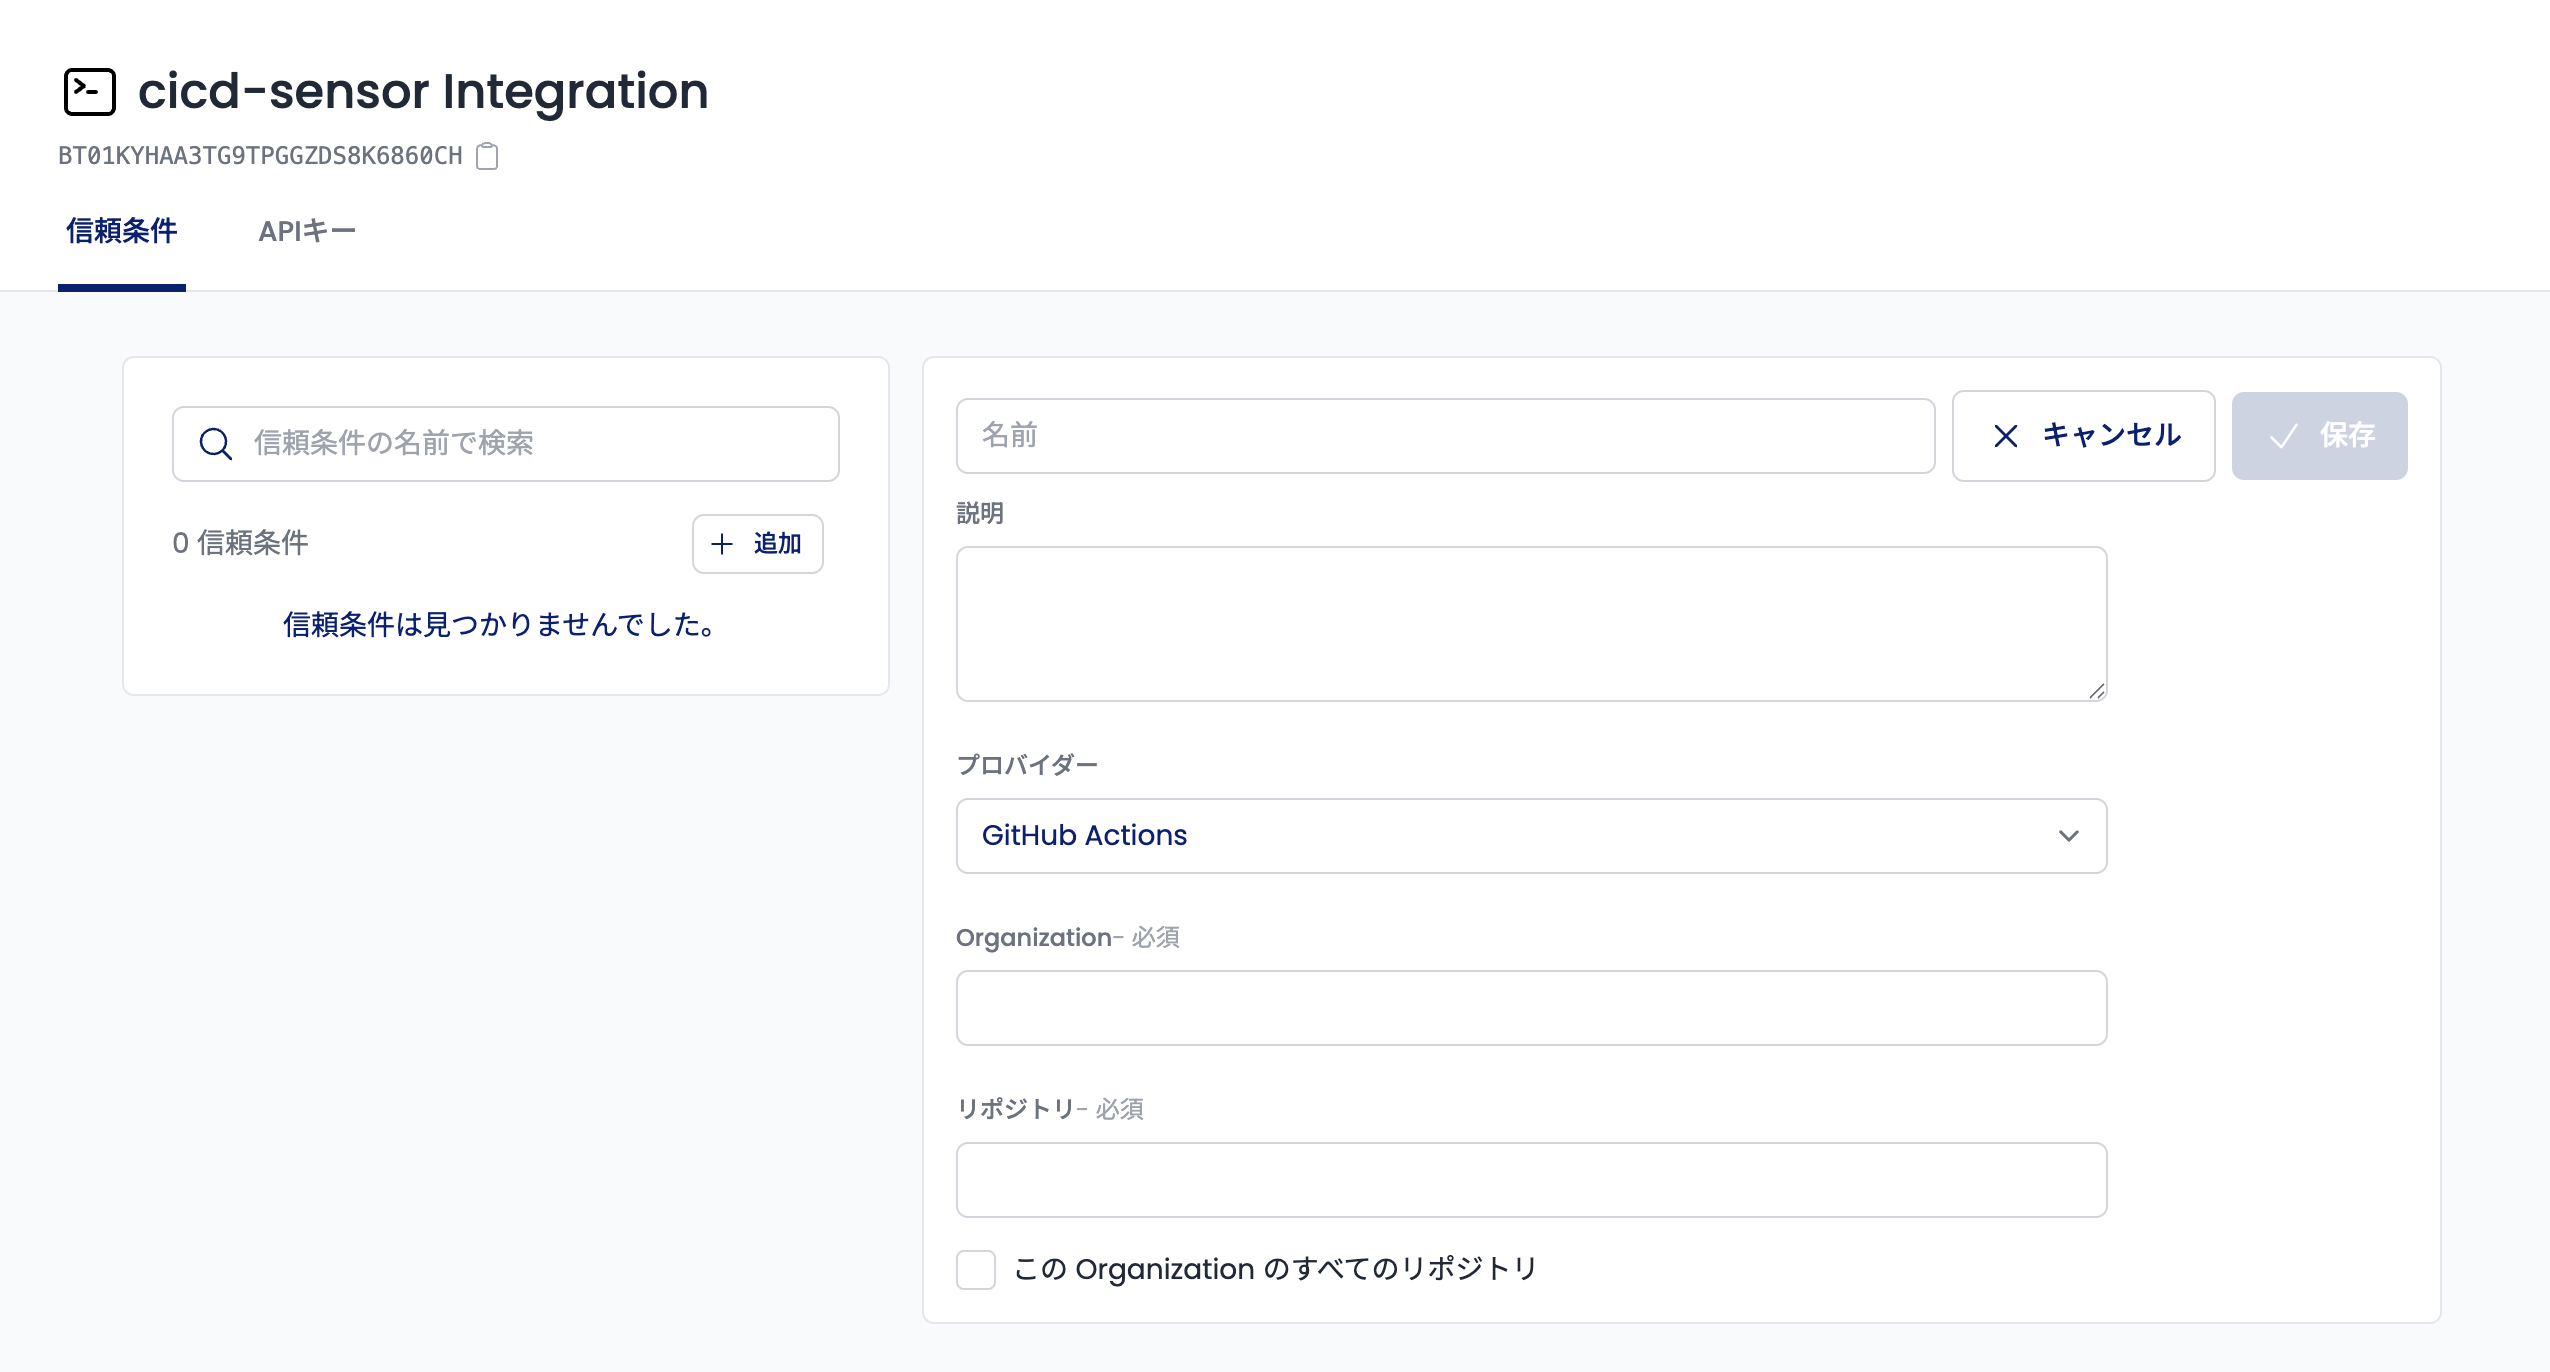
Leave the audience field empty. flatt-security/shisho-cloud-action@v1 does not request a specific audience, and an empty field means the token's aud claim is not checked. Set it only if your workflow requests a specific audience, and enter exactly that value.
Once the bot is created, next set up the workflow to obtain an OIDC token.
If you are using GitHub Actions, the token can be obtained with flatt-security/shisho-cloud-action@v1. Obtaining the OIDC token requires the id-token: write permission.
A job with id-token: write can issue GitHub OIDC tokens. These tokens can be used with services other than Shisho Cloud, so if the job is compromised, they could be abused to access other services. Here, environment is set to cicd-sensor so that the token carries this value in its subject, which lowers the chance that it can be used with other services. Also, take care not to run more than necessary within the scope of id-token: write.
The following workflow obtains the OIDC token:
jobs:
  build:
    runs-on: ubuntu-latest
    environment: cicd-sensor # dedicated to this job
    permissions:
      contents: read
      id-token: write
    steps:
      - id: auth
        uses: flatt-security/shisho-cloud-action@v1
        with:
          bot-id: <bot ID>
          export-token: true
          expires-in-minutes: 360
      - uses: cicd-sensor/cicd-sensor-action@6511eb44c91d71b2b93d71193b1bf2cb18352f66 # v0.0.38
        with:
          manager-url: https://manager.cicdsensor.cloud.shisho.dev
          manager-token: ${{ steps.auth.outputs.token }}
Replace <bot ID> with the ID of the bot created.
The token lifetime (expires-in-minutes) is fixed at issue time and the token cannot be refreshed, so it must cover the duration of the job execution.
Option B: bot API key
To issue an API key, open the API key tab in the bot page. From here, you can create a new API key.
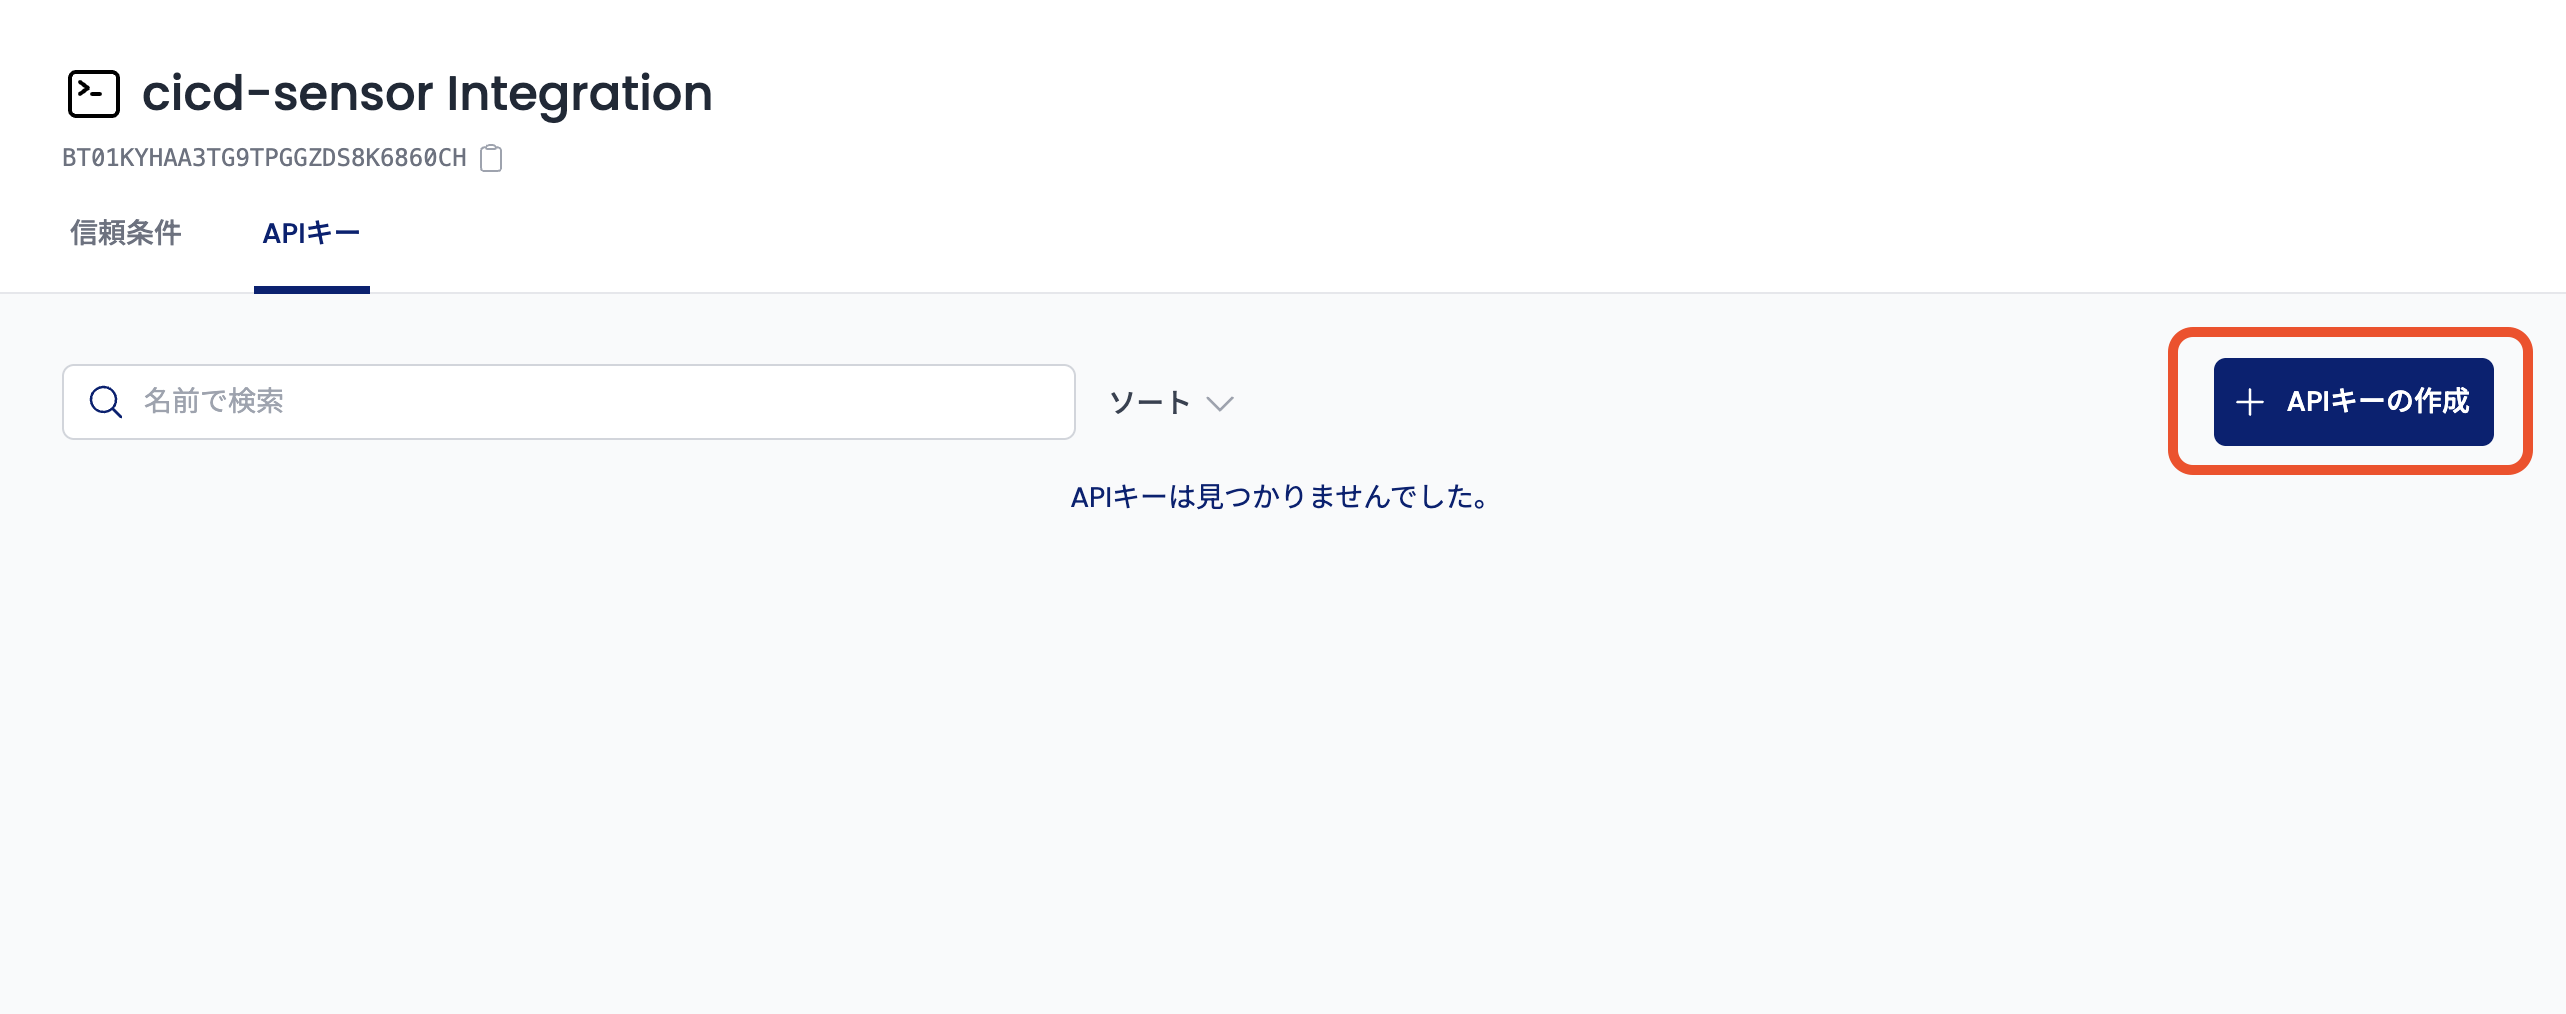
The exact format of the token that will need to be sent to the Manager is the following:
<API key>:<bot ID>
Store this value somewhere safe, such as your GitHub org's secrets. Assuming it is available in the workflow as secrets.SHISHO_CICD_SENSOR_TOKEN, you would specify it like this:
steps:
  - uses: cicd-sensor/cicd-sensor-action@6511eb44c91d71b2b93d71193b1bf2cb18352f66 # v0.0.38
    with:
      manager-url: https://manager.cicdsensor.cloud.shisho.dev
      manager-token: ${{ secrets.SHISHO_CICD_SENSOR_TOKEN }}
Managing cicd-sensor rules and config
In addition to handling trace logs, a cicd-sensor Manager is also responsible for setting rules and configurations. In Takumi's Manager, the rules and config files are updated by pushing OCI artifacts with ORAS to a Takumi registry.
- Registry endpoint for rules:
configs.cicdsensor.cloud.shisho.dev/orgs/<org_id>/rules - Registry endpoint for the config file:
configs.cicdsensor.cloud.shisho.dev/orgs/<org_id>/config
<org_id> is your Shisho Cloud organization ID.
Pushing requires a bot with the mission specific role Takumi Runner Config Manager. To create a bot, check the Authentication section above where we created a bot for sending trace logs. A separate bot will need to be created for this. Just like sending trace logs, either keyless OIDC or API-key authentication is available.
We recommend managing the rules and config in the .cicd-sensor/ directory of your repository. They can be pushed with the following workflow:
name: push-cicd-sensor-rules-and-config
on:
  push:
    branches: [main]
    paths:
      - ".cicd-sensor/**"

permissions:
  id-token: write
  contents: read

jobs:
  push:
    runs-on: ubuntu-24.04
    steps:
      - uses: actions/checkout@v4

      - name: Install cicd-sensorctl
        run: |
          curl -fsSL -o /tmp/cicd-sensor.tar.gz \
            "https://github.com/cicd-sensor/cicd-sensor/releases/download/releases/v0.0.44/cicd-sensor_0.0.44_linux_amd64.tar.gz"
          tar -xzf /tmp/cicd-sensor.tar.gz -C /tmp ./cicd-sensorctl-linux-amd64
          sudo install /tmp/cicd-sensorctl-linux-amd64 /usr/local/bin/cicd-sensorctl

      - uses: oras-project/setup-oras@1d808f7d7f6995cc68b7bf507bfe5c5446e1dc9d # v2.0.1

      - id: auth
        uses: flatt-security/shisho-cloud-action@v1
        with:
          bot-id: <bot ID> # a bot with the "Takumi Runner Config Manager" role
          export-token: true

      - name: Log in to the registry
        run: |
          printf '%s' '${{ steps.auth.outputs.token }}' |
            oras login configs.cicdsensor.cloud.shisho.dev --username '<bot ID>' --password-stdin

      - name: Bundle, validate, and push the rules
        run: |
          cicd-sensorctl rule bundle --input-dir .cicd-sensor/rules --output-file bundle.yaml
          cicd-sensorctl rule validate bundle.yaml
          gzip -nc bundle.yaml > bundle.yaml.gz
          echo "rule bundle digest: sha256:$(sha256sum bundle.yaml.gz | cut -d' ' -f1)" # keys the status check below
          oras push "configs.cicdsensor.cloud.shisho.dev/orgs/<org_id>/rules:v1" \
            --artifact-type application/vnd.cicd-sensor.baseline.rules.config.v1+json \
            bundle.yaml.gz:application/vnd.cicd-sensor.baseline.rules.v1+yaml+gzip

      - name: Push the config file
        run: |
          gzip -nc .cicd-sensor/config.yaml > config.yaml.gz
          echo "config bundle digest: sha256:$(sha256sum config.yaml.gz | cut -d' ' -f1)" # keys the status check below
          oras push "configs.cicdsensor.cloud.shisho.dev/orgs/<org_id>/config:v1" \
            --artifact-type application/vnd.cicd-sensor.config.v1+json \
            config.yaml.gz:application/vnd.cicd-sensor.config.v1+yaml+gzip
The rules and the config file are pushed through basically the same flow, but the rules are validated once with cicd-sensorctl before being pushed, to catch configuration mistakes beforehand.
Once pushed, the status can be checked with the digests the job prints — under /v1/rule-bundles for rules and /v1/config-bundles for the config file:
$ curl -H "Authorization: Bearer <token>" \
    "https://configs.cicdsensor.cloud.shisho.dev/v1/rule-bundles/sha256:<digest>/status"
{"state": "promoted", ...}
The state is one of three values: pending, promoted, or rejected. If the bundle is faulty, the state will be rejected. If it passes validation, the state will be promoted and will then be applied to all jobs. pending means the push is still being processed.
When using Takumi's Manager, the only setting that can be updated is output_settings.detection.enabled. All other settings will be ignored.
output_settings:
  detection:
    enabled: true
Using Takumi features
Once a job that uses cicd-sensor finishes, the results are reflected in the Shisho Cloud console. You can check the visualized trace data and use Trace Search and Threat Detection.
Pricing
For the cicd-sensor integration pricing, see Pricing.