自社固有の検査を実装する
Shisho Cloud がネイティブで有する検査機能は、多くのクラウドサービスに対して、多くの検査項目をカバーしています。 しかし、自社固有の検査項目を実装したい場合もあるでしょう。そのような場合には、Shisho Cloud が提供する検査機能を拡張できます。
本チュートリアルでは、Shisho Cloud が提供する検査機能を拡張する方法を説明します。 具体的には、以下を実践します:
- Shisho Cloud への検査仕様(Specification)の登録
- Shisho Cloud ポリシーの記述・デプロイ
準備
ポリシーを記述する言語によって手順が異なります。
- Rego
- TypeScript
以下のように Shisho Cloud Rego SDK をクローンした後、本チュートリアルで作成するポリシーコードの保管場所として your-policy ディレクトリを作成してください:
git clone https://github.com/flatt-security/shisho-cloud-rego-libraries.git

mkdir ./your-policy
cd ./your-policy
この時点では、以下のようなディレクトリ構成になっているはずです:
.
├── your-policy
└── shisho-cloud-rego-libraries
最終的なディレクトリ構成は以下のようになります:
.
├── your-policy
│   ├── implementation
│   │   ├── decide.rego
│   │   ├── decide_test.rego
│   │   ├── decide.graphql
│   │   └── manifest.yaml
|   ├── specification
│       └── dgspec.yaml
└── shisho-cloud-rego-libraries
検査ルールの実装では JavaScript/TypeScript ランタイムとして Deno を利用しますので、Deno 公式ドキュメントを参照して Deno をインストールしてください。また、お使いのエディタに対応した Deno のプラグインをインストールしておくとさらに便利です。
Shisho Cloud 向けのポリシーコードを記述する際に利用するライブラリは、shisho_cloud_policy_helpers として公開されています。Deno では以下のように import 文でライブラリを直接参照できますので、ライブラリ等のインストールは不要です。
import { DecisionPolicy } from "https://deno.land/x/shisho_cloud_policy_helpers/decision/mod.ts";
検査仕様を定義する
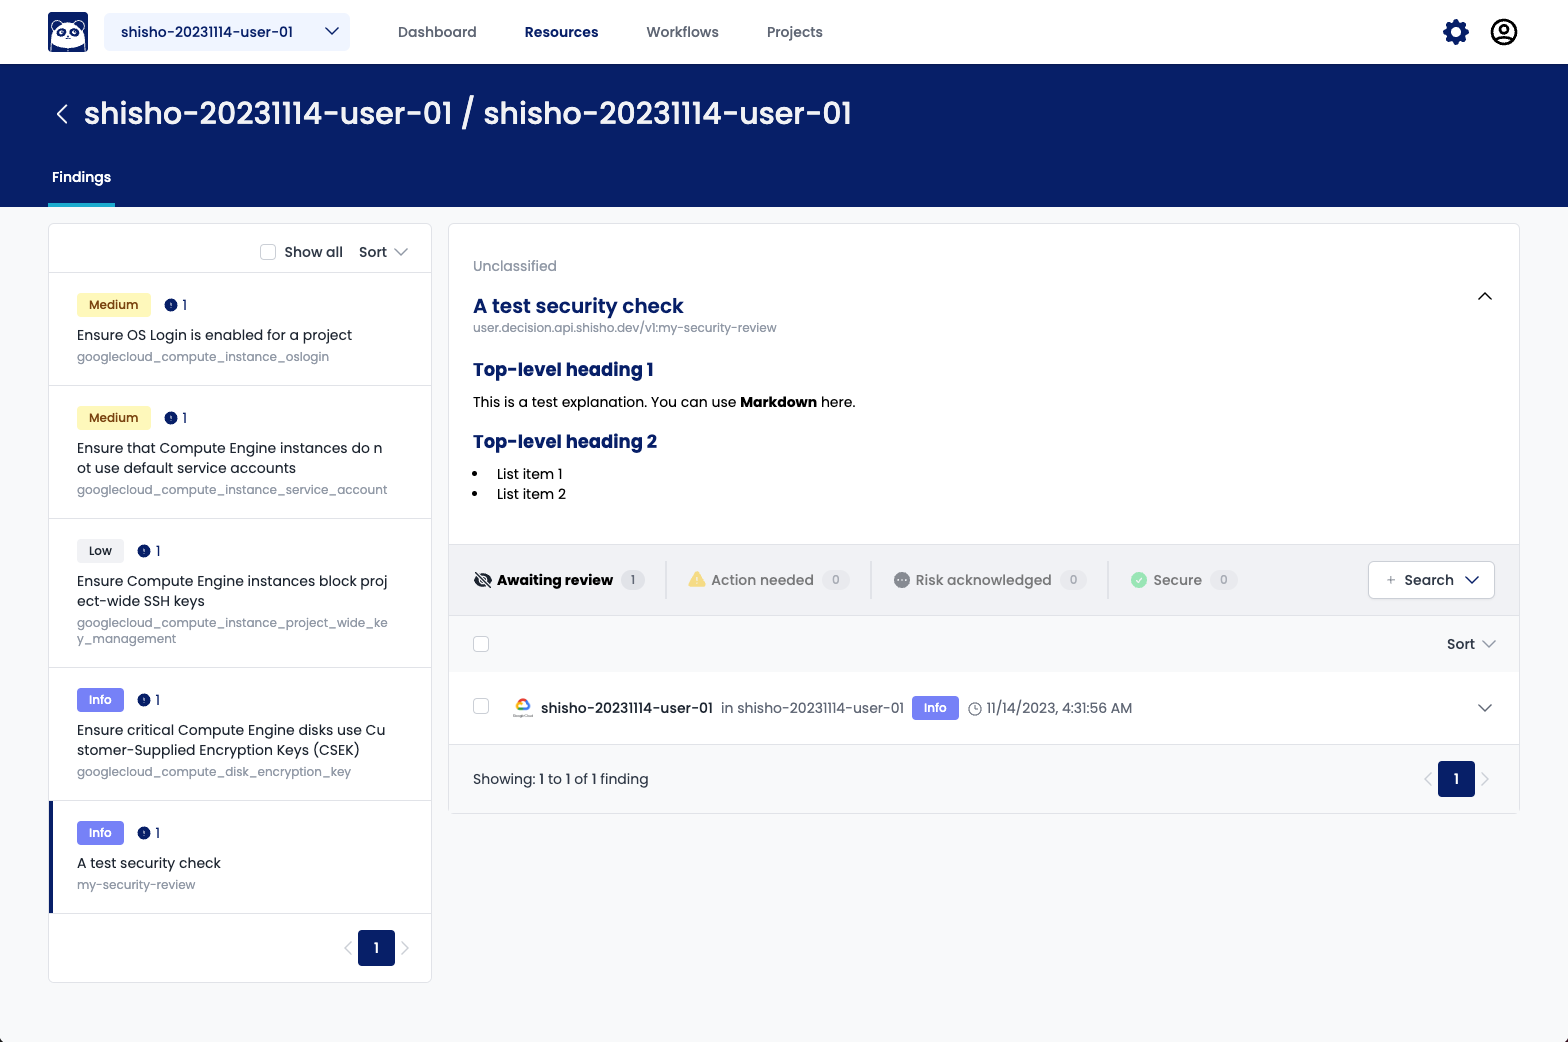
まずは検査仕様を定義しましょう。検査仕様は、Shisho Cloud における検査項目の定義です。検査仕様は、以下の画面例の "A test security check" や "Top-level heading 1" の箇所のような位置で表示され、Shisho Cloud 上に追加したリスクがどのような背景を持つものなのかを説明するために用います:
検査仕様の定義には YAML を用います。
./your-policy/specification/dgspec.yaml というファイルを作成し、コメントの指示に従いながら検査の概要を説明してみてください:
version: "1.0"

# Each specification defines metadata for a single security check, identified with the pair (apiVersion, kind).
specifications:
  - # A custom value to group your "kind"s; it should satisfy ^[0-9a-zA-Z./\\-_]{1,128}$
    # You can change this value as you like.
    apiVersion: "user.decision.api.shisho.dev/v1"
    # A value to represent what this specification is for with the combination of apiVersion; it should satisfy ^[0-9a-zA-Z.\\-_]{1,128}$
    # You can change this value as you like.
    kind: "my-security-review"
    # Any non-empty string to summarize the security check
    # You can change this value as you like.
    title: "A test security check"
    # Any non-empty string, describing background of the security check; potential risk, how to mitigate, etc.
    # You can change this value as you like in Markdown format.
    explanation: |
      This is a test explanation. You can use **Markdown** here.
完成したら、以下のコマンドを実行して検査仕様を Shisho Cloud に登録しましょう:
shishoctl dgspec apply -o $SHISHO_ORG_ID -f "your-policy/specification/dgspec.yaml"
登録が完了したら、以下のコマンドを実行して検査仕様が正しく登録されたことを確認してください:
$ shishoctl dgspec describe "user.decision.api.shisho.dev/v1" "my-security-review" -o $SHISHO_ORG_ID | jq -r
{
  "apiVersion": "user.decision.api.shisho.dev/v1",
  "kind": "my-security-review",
  "title": "A test security check",
  "explanationMarkdown": "This is a test explanation. You can use **Markdown** here.\n",
  "createdAt": "2023-11-13T19:05:41Z",
  "updatedAt": "2023-11-13T19:05:41Z"
}
これで、Shisho Cloud における検査仕様の定義が完了しました。
なお explanation には Markdown を用いることができ、かつ dgspec.yaml には explanation をファイルパスで指定することもできます。
以下に定義の例を示します:
version: "1.0"

specifications:
  - apiVersion: "user.decision.api.shisho.dev/v1"
    kind: "my-security-review"
    title: "A test security check"
    explanation: !include "./explanation.md"
This is a test explanation. You can use **Markdown** here.
検査対象データを定義する
さて、それでは先程の検査仕様を用いて、実際に検査を実装してみましょう。
ここでは例として、Google Compute Engine のインスタンスのマシンタイプが f1-micro である場合に問題を報告する検査を実装します。
以下の URL の [oid] を Shisho Cloud の組織 ID に置き換えて、Shisho Cloud の GraphQL Playground にアクセスしてください:
https://cloud.shisho.dev/[oid]/playground/query

表示された Playground を用いると、上述のような検査を実装するためには、以下のような形で検査対象データを取得できることが分かります:
query {
  googleCloud {
    projects {
      number
      computeEngine {
        instances {
          metadata {
            id
          }
          name
          machineType
        }
      }
    }
  }
}
検査を実装する
- Rego
- TypeScript
検査対象データが取得できたら、次は検査を実装します。
Google Compute Engine のインスタンスのマシンタイプが f1-micro である場合に問題を報告する場合は、例えば以下のような形で実装できます:
package custom
import data.shisho

decisions[d] {
	project := input.googleCloud.projects[_]
	instance := project.computeEngine.instances[_]
	allowed := instance.machineType != "f1-micro"

	d := shisho.decision.new({
		# The API version and kind are used to identify the decision.
		# In this case you should specify what you defined in your dgspec.yaml file.
		"api_version": "user.decision.api.shisho.dev/v1",
		"kind": "my-security-review",

		# The subject is the resource that the decision is about.
		# In this case this policy reports posture review on each instance, so the subject is the instance.
		# You should use `metadata` to identify the resource.
		"subject": instance.metadata.id,

		# The locator is used to identify the location of the detected issue within `subject`.
		# It should be empty for most cases.
		"locator": "",

		# The severity is used to indicate the importance of the decision.
		"severity": shisho.decision.severity_info,

		# The allowed field is used to indicate whether the resource is allowed or not.
		"allowed": allowed,

		# Any additional information can be added to the payload.
		# This will be useful when you want to display more information about the decision in the UI.
		"payload": json.marshal({"machine_type": instance.machineType}),
	})
}
上述の実装を ./your-policy/implementation/decide.rego とし、今度はテストコードも記述してみましょう。
./your-policy/implementation/decide_test.rego というファイルを作成し、以下を参考に、自分が記述したポリシーコードに対するテストコードを記述してみてください:
package custom

import data.shisho
import future.keywords

test_my_policy_works if {
	count([d |
		decisions[d]
		shisho.decision.is_allowed(d)
	]) == 1 with input as {"googleCloud": {"projects": [{"computeEngine": {"instances": [
		{
			"metadata": {"id": "google-cloud-ce-instance|354711641168|asia-northeast2-a|7816137240199088770"},
			"name": "pod",
			"machineType": "f1-micro",
		},
		{
			"metadata": {"id": "google-cloud-ce-instance|354711641168|asia-northeast2-a|7816137240199088771"},
			"name": "pod",
			"machineType": "g1-small",
		},
	]}}]}}
}
テストコードを実行すると、どうやら実装した検査が正しく動作することが分かります:
$ opa test ./your-policy ./shisho-cloud-rego-libraries
検査対象データが取得できたら、そのデータの型定義を生成し、それを元に検査ロジックを実装します。
先ほどの GraphQL クエリに対応する TypeScript の型定義は、次のコマンドを用いて生成できます:
shishoctl codegen typescript-input --query-path=./your-policy/implementation/decide.graphql --output=./your-policy/implementation/input.gen.ts
このコマンドを実行すると、以下のように検査対象データを表す型 Input が定義されます。このファイルには型そのものだけでなく各フィールドのドキュメンテーションも記載されているので、検査ロジックを実装する際には元の GraphQL クエリよりもこの input.gen.ts の方が参照しやすいでしょう。
/** The type corresponding to the result of the GraphQL query */
export type Input = {
  /** All data from Google Cloud integration */
  googleCloud: {
    /** Projects in Google Cloud */
    projects: Array<{
      /** The number uniquely identifying the project like `415104041262` */
      number_: Int;
      /** Data on Google Cloud Compute Engine */
      computeEngine: {
        /** All Google Cloud Compute Engine instances */
        instances: Array<{
          /** The metadata to identify this resource in Shisho Cloud */
          metadata: {
            /** The ID to identify the report in Shisho Cloud */
            id: ResourceID;
          };
          /** The user-provided instance name */
          name: string;
          /** The machine type to use for instances that are created from this machine image */
          machineType: string;
        }>;
      };
    }>;
  };
};
以上で検査対象データの型定義が得られたので、これを用いて検査ロジックを表す関数 decide を実装します。この関数を実装する際のファイル名を、ここでは ./your-policy/implementation/decide.ts とします。
まずは関数 decide の型を、以下のように DecisionPolicy<Input> として明示しておきます。この型は、入力として Input を受け取り1検査結果の配列 Decision[] を返す関数を表します。
import { Input } from "./input.gen.ts";
import { DecisionPolicy } from "https://deno.land/x/shisho_cloud_policy_helpers@v0.0.1/decision/mod.ts";

// Basically the same as `const decide = (input: Input): Decision[] => { ... }`
const decide: DecisionPolicy<Input> = (input) => {
  /* TODO */
};
この関数が Shisho Cloud 上で実行されるためには、以下のように decide を decision_policy_adapter という関数でラップしたものをデフォルトエクスポートする必要があります。ラッパー関数 decision_policy_adapter には、先ほど生成した input.gen.ts で定義されている convert_input を引数として与える必要があります。
import { convert_input, Input } from "./input.gen.ts";
import {
  DecisionPolicy,
  decision_policy_adapter,
} from "https://deno.land/x/shisho_cloud_policy_helpers@v0.0.1/decision/mod.ts";

const decide: DecisionPolicy<Input> = (input) => {
  /* TODO */
};

export default decision_policy_adapter(convert_input)(decide);
では、関数 decide の中身を実装していきます。Google Compute Engine のインスタン��スのマシンタイプが f1-micro である場合に問題を報告する場合は、例えば以下のような形で実装できます:
import {
  type Decision,
  type DecisionPolicy,
  SEVERITY_INFO,
  TYPE_ALLOW,
  TYPE_DENY,
  decision_policy_adapter,
} from "https://deno.land/x/shisho_cloud_policy_helpers@v0.0.1/decision/mod.ts";
import { type Input, convert_input } from "./input.gen.js";

const decide: DecisionPolicy<Input> = (input) =>
  input.googleCloud.projects.flatMap((project) =>
    project.computeEngine.instances.map((instance): Decision => {
      return {
        header: {
          // The API version and kind are used to identify the decision.
          // In this case you should specify what you defined in your dgspec.yaml file.
          api_version: "user.decision.api.shisho.dev/v1",
          kind: "my-security-review",

          // The subject is the resource that the decision is about.
          // In this case this policy reports posture review on each instance, so the subject is the instance.
          // You should use `metadata` to identify the resource.
          subject: instance.metadata.id,

          // The severity is used to indicate the importance of the decision.
          severity: SEVERITY_INFO,

          // The type field is used to indicate whether the resource is allowed or not.
          type: instance_is_allowed(instance) ? TYPE_ALLOW : TYPE_DENY,
        },

        // Any additional information can be added to the payload.
        // This will be useful when you want to display more information about the decision in the UI.
        payload: { machine_type: instance.machineType },
      };
    }),
  );

// Tip: You can obtain a part of the type `Input` using indexed access types.
type Instance =
  Input["googleCloud"]["projects"][number]["computeEngine"]["instances"][number];
const instance_is_allowed = (instance: Instance) =>
  instance.machineType !== "f1-micro";

export default decision_policy_adapter(convert_input)(decide);
以上でポリシーコードの実装が完了したので、今度はテストコードを記述します。
テストの方針としては、検査のロジックを表す decide 関数に何らかの入力を与えてみて、出力された検査結果が期待通りであるかを確認するのが良いでしょう。テストコードが decide 関数をインポートできるように、先ほどの decide.ts において decide をエクスポートしておきます。
-const decide: DecisionPolicy<Input> = (input) =>
+export const decide: DecisionPolicy<Input> = (input) =>
では ./your-policy/implementation/decide_test.ts というファイルを作成し、以下を参考に、自分が記述したポリシーコードに対するテストコードを記述してみてください:
import { assertEquals } from "https://deno.land/std@0.202.0/assert/assert_equals.ts";
import {
  TYPE_ALLOW,
  TYPE_DENY,
} from "https://deno.land/x/shisho_cloud_policy_helpers@v0.0.1/decision/mod.ts";
import { decide } from "./decide.js";
import type { Input } from "./input.gen.js";

Deno.test("my policy works", () => {
  const input: Input = {
    googleCloud: {
      projects: [
        {
          number_: 111111111111,
          computeEngine: {
            instances: [
              {
                name: "instance-1",
                metadata: {
                  id: "googlecloud-ce-instance|654126103884|asia-northeast2|5358538573343679550",
                },
                machineType: "t2-micro",
              },
              {
                name: "instance-2",
                metadata: {
                  id: "googlecloud-ce-instance|654126103884|asia-northeast1|4792791042783564850",
                },
                machineType: "t1-large",
              },
            ],
          },
        },
        {
          number_: 222222222222,
          computeEngine: {
            instances: [
              {
                name: "instance-3",
                metadata: {
                  id: "googlecloud-ce-instance|471807136351|asia-northeast2|1620402794530716984",
                },
                machineType: "f1-micro",
              },
              {
                name: "instance-4",
                metadata: {
                  id: "googlecloud-ce-instance|471807136351|asia-northeast1|15166759912670900731",
                },
                machineType: "t2-large",
              },
            ],
          },
        },
      ],
    },
  };

  const decisions = decide(input, undefined);

  assertEquals(decisions.filter((d) => d.header.type === TYPE_ALLOW).length, 3);
  assertEquals(decisions.filter((d) => d.header.type === TYPE_DENY).length, 1);
});
テストコードを実行すると、どうやら実装した検査が正しく動作することが分かります:
$ deno test ./your-policy/implementation/decide_test.ts
Check file:///path/to/your-policy/implementation/decide_test.ts
running 1 test from ./your-policy/implementation/decide_test.ts
my policy works ... ok (0ms)

ok | 1 passed | 0 failed (1ms)
ワークフローを定義する
最後のステップとして、先程実装した検査ロジックを実行するワークフローを定義します。 ワークフローは、Shisho Cloud における検査をまとめる単位であり、どのタイミングでポリシーを実行するべきかを定義する トリガー を含んでいます。
ワークフローの定義には YAML を用います。
./your-policy/implementation/manifest.yaml というファイルを作成し、コメントの指示に従いながらワークフローを定義してみてください:
- Rego
- TypeScript
version: 0.1.0

id: "my-review-workflow"
name: "My first workflow"

triggers:
  schedule:
    # Runs every hour
    - cron: "0 */1 * * *"

jobs:
  - id: review-googlecloud-instance-type
    name: "Review instance types of Google Cloud instances"
    decide:
      rego: !include ./decide.rego
      input:
        schema: !include ./decide.graphql
version: 0.1.0

id: "my-review-workflow"
name: "My first workflow"

triggers:
  schedule:
    # Runs every hour
    - cron: "0 */1 * * *"

jobs:
  - id: review-googlecloud-instance-type
    name: "Review instance types of Google Cloud instances"
    decide:
      typescript: !bundle_typescript ./decide.ts
      input:
        schema: !include ./decide.graphql
このワークフローをデプロイする下準備として、以下のコマンドでポリシーコードが利用するライブラリをダウンロードする必要があります:
deno vendor $(find . -name '*.[jt]s' -not -path './vendor/*')
ワークフローをデプロイする
さて、最後に、完成したワークフローを Shisho Cloud にデプロイしてみましょう。 以下のコマンドを実行してください:
- Rego
- TypeScript
shishoctl workflow apply -o $SHISHO_ORG_ID -f ./your-policy/implementation/manifest.yaml
shishoctl workflow apply -o $SHISHO_ORG_ID -f ./your-policy/implementation/manifest.yaml --js-import-map=./vendor/import_map.json --workspace-root=.
デプロイが完了したら、以下のようなコマンドで、schedule トリガーの発火を待たずにワークフローを実行できます:
shishoctl workflow run -o $SHISHO_ORG_ID my-review-workflow
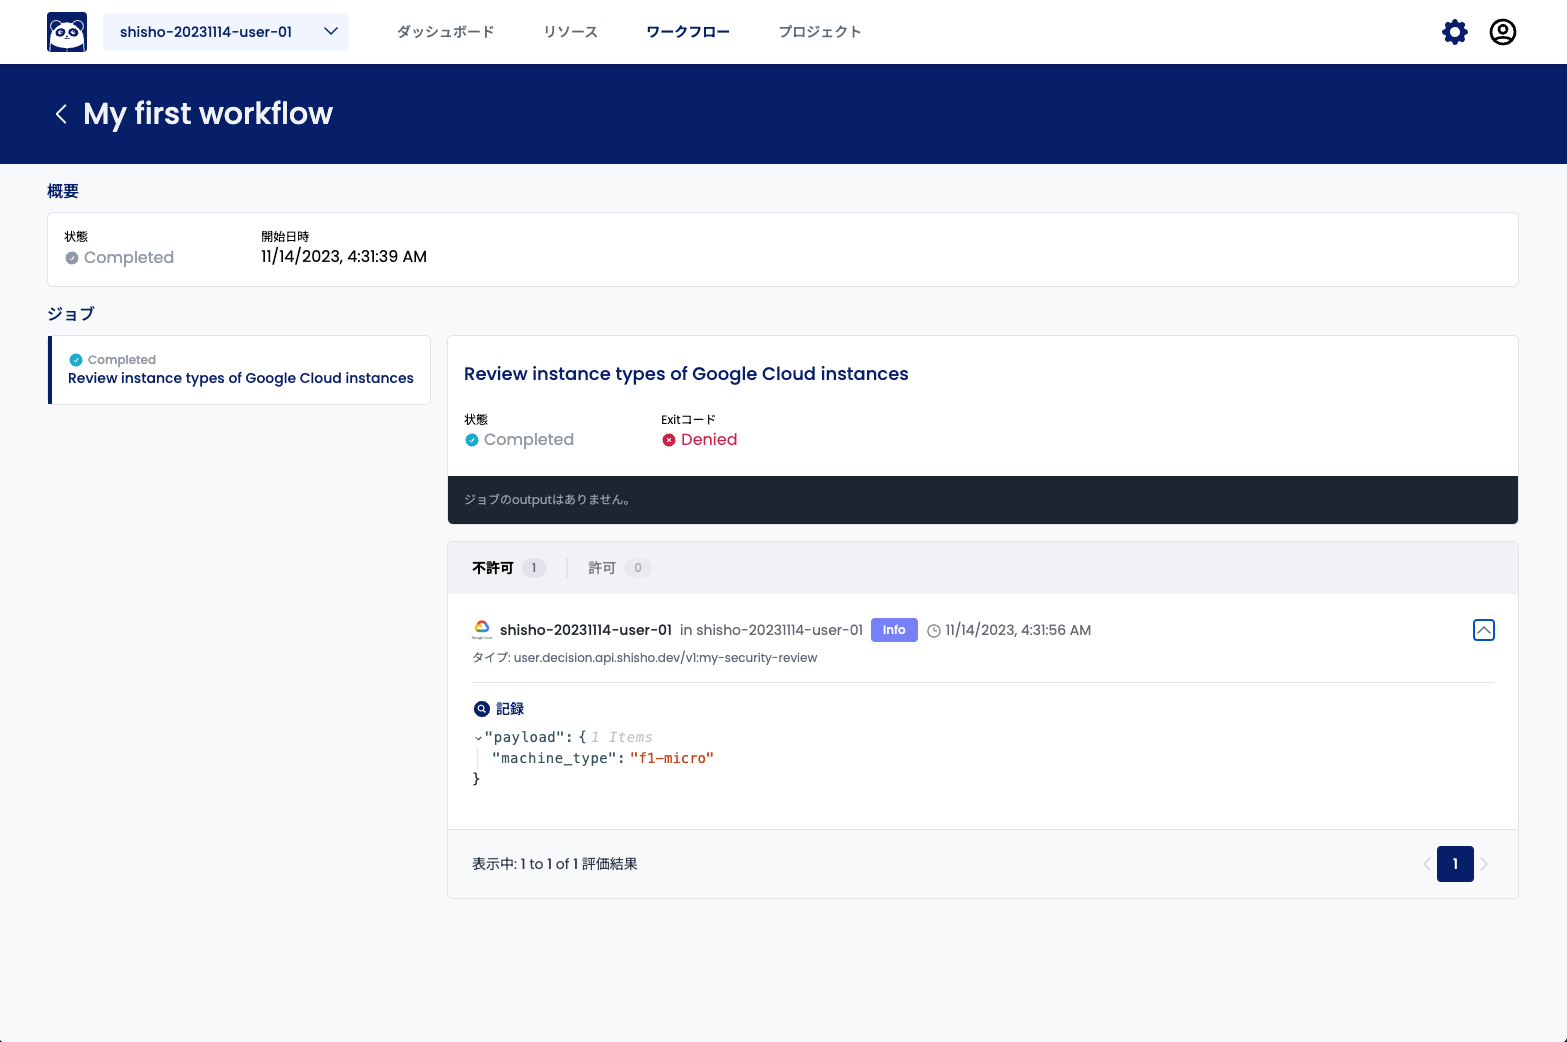
しばらくするとワークフローの実行が完了します:
実行結果の詳細や、検査結果を確認すると、たしかに f1-micro であるインスタンスが不受理されていることが分かります:
このような形で、ついに Shisho Cloud における検査を拡張することができました!
まとめ
本チュートリアルでは、Shisho Cloud が提供する検査機能を拡張する方法を説明しました。 具体的には、以下を実践しました:
- Shisho Cloud への検査仕様(Specification)の登録
- Shisho Cloud ポリシーの記述・デプロイ